Moving and rotating objects
When you open a new blank for the first time, all objects are centered in the middle of the blank. You need to move them to their desired positions.
There are 2 ways to move and rotate objects in the nesting view for adjusting objects:
- About the blank display Quickly position and rotate the objects with the mouse in the top view.
- Via the corresponding editing function This requires a few more clicks, but gives you more options.
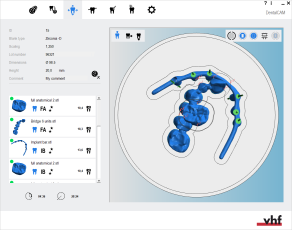
- Open the Nesting view for adjusting objects with the following icon in the main icon bar:

Moving objects in X- and Y-direction using the top view
This procedure belongs to step 1 of the simple nesting workflow.
- Position your objects horizontally and vertically in the top view.
- Rotate your objects about the Z-axis in the top view.
- Check if all cavities and drillings are correct.
- Specify the drilling range for objects with unrecognized drillings.
- Mark the cavities for objects with unrecognized cavities.
- Set bars for all objects.
This procedure belongs to step 3 of the complete nesting workflow.
- Delete any incorrect machined areas.
- Change the status of objects and delete non-required objects.
- Position your objects horizontally and vertically in the top view.
- Rotate your objects about the Z-axis in the top view.
- Adjust the height position of your objects and/or rotate them about the X/Y-axis (required for multilayered blanks).
- Check if all cavities and drillings are correct.
- Specify the drilling range for objects with unrecognized drillings.
- Mark the cavities for objects with unrecognized cavities.
- Create a sinter bar for objects that require a sinter bar.
- Set drops for objects that require drops.
- Mark the attachment for objects with an attachment.
- Activate anterior tooth editing for the desired object)
- Edit or delete labels milled on objects.
- Set bars for all objects.
Moving objects in the X- and Y-direction via the top view means looking onto the blank from above and moving the objects in a 2D plane along the X- and Y-axis.
To quickly move objects horizontally and vertically, do the following:
- Select the top view. Toggling the view of the blank display
- Select and hold an object that you want to move.
- Move the object to the desired position by dragging the mouse.
- Release the mouse button.
- Make sure that the object lies within the boundaries of the blank. An incorrect position is indicated by red flash icons.
- Make sure that the workspaces of all objects do not overlap too much. An incorrect position is indicated by red flash icons.
-
When working with cobalt chrome (CoCr) or titanium, the workspace must not overlap at all.
-
R5: In the general application settings, you can deactivate the required safety distance from the disc rim. Extended milling range
Quickly rotating objects about the Z-axis in the top view
This procedure belongs to step 2 of the simple nesting workflow.
- Position your objects horizontally and vertically in the top view.
- Rotate your objects about the Z-axis in the top view.
- Check if all cavities and drillings are correct.
- Specify the drilling range for objects with unrecognized drillings.
- Mark the cavities for objects with unrecognized cavities.
- Set bars for all objects.
This procedure belongs to step 4 of the complete nesting workflow.
- Delete any incorrect machined areas.
- Change the status of objects and delete non-required objects.
- Position your objects horizontally and vertically in the top view.
- Rotate your objects about the Z-axis in the top view.
- Adjust the height position of your objects and/or rotate them about the X/Y-axis (required for multilayered blanks).
- Check if all cavities and drillings are correct.
- Specify the drilling range for objects with unrecognized drillings.
- Mark the cavities for objects with unrecognized cavities.
- Create a sinter bar for objects that require a sinter bar.
- Set drops for objects that require drops.
- Mark the attachment for objects with an attachment.
- Activate anterior tooth editing for the desired object)
- Edit or delete labels milled on objects.
- Set bars for all objects.
You rotate objects about the Z-axis as follows:
- Select and hold an object that you want to rotate.
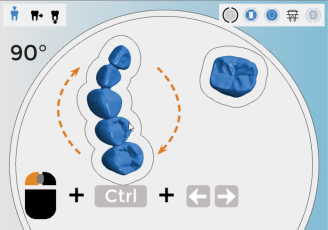
- If you want to rotate the object by 90°:
- Hold down either the Shift key or the Ctrl key.
- Press the left arrow key to rotate the object counterclockwise or the right arrow key to rotate the object clockwise.
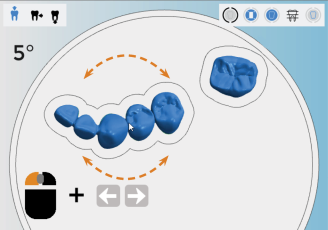
- If you want to rote the object by 5°, press the Left arrow key to rotate the object counterclockwise or the Right arrow key to rotate the object clockwise.
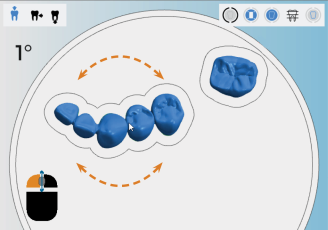
- If you want to rotate the object in steps of 1°, use the mouse wheel:
- To rotate the object clockwise, turn the mouse wheel away from you.
- To rotate the object counterclockwise, turn the mouse wheel towards you.
- Release the mouse button.
Moving and rotating objects in blocks
This procedure belongs to steps of the simple nesting workflow.
- Position your objects horizontally and vertically in the top view.
- Rotate your objects about the Z-axis in the top view.
- Check if all cavities and drillings are correct.
- Specify the drilling range for objects with unrecognized drillings.
- Mark the cavities for objects with unrecognized cavities.
- Set bars for all objects.
This procedure belongs to steps 3 & 4 of the complete nesting workflow.
- Delete any incorrect machined areas.
- Change the status of objects and delete non-required objects.
- Position your objects horizontally and vertically in the top view.
- Rotate your objects about the Z-axis in the top view.
- Adjust the height position of your objects and/or rotate them about the X/Y-axis (required for multilayered blanks).
- Check if all cavities and drillings are correct.
- Specify the drilling range for objects with unrecognized drillings.
- Mark the cavities for objects with unrecognized cavities.
- Create a sinter bar for objects that require a sinter bar.
- Set drops for objects that require drops.
- Mark the attachment for objects with an attachment.
- Activate anterior tooth editing for the desired object)
- Edit or delete labels milled on objects.
- Set bars for all objects.
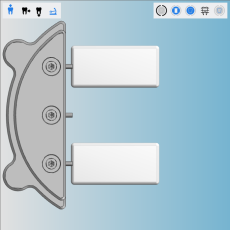
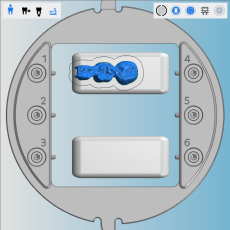
You can position one or more objects per block. Follow the standard procedure for positioning and rotating objects. Block-specific tasks are detailed below:
-
Create a job and select a blank type for blocks.
-
Import a suitable object into the job.
-
dentalcam displays the block holder and the maximum number of blocks that the current machine can process in 1 job.
Different machines can process different numbers of blocks per job. Sometimes the number of blocks is limited by the selected blank type
-
Activate or deactivate the placement aid by selecting the corresponding icon in the top left corner of the blank display:
- Placement aid is activated (recommended):

- Placement aid is deactivated:


Icon bar with the icon that displays that the placement aid is activated (marked orange)
- Placement aid is activated (recommended):
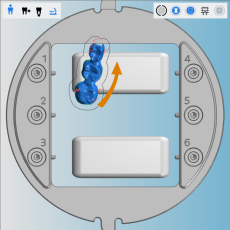
- When you drag an object onto a block with the placement aid activated, the object automatically snaps into a proper position on the X- and Y-axis.
-
If required, rotate the objects about the Z-axis so that they completely lie within the block. You can also rotate them about the X- and Y-axis.
-
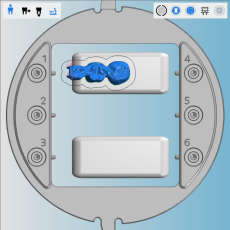
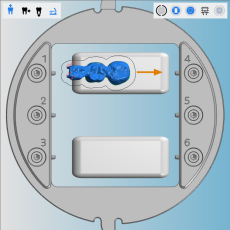
Move the objects until they are fully positioned in the block.
Moving and rotating objects via the editing function
This procedure does not belong to the simple nesting workflow.
- Position your objects horizontally and vertically in the top view.
- Rotate your objects about the Z-axis in the top view.
- Check if all cavities and drillings are correct.
- Specify the drilling range for objects with unrecognized drillings.
- Mark the cavities for objects with unrecognized cavities.
- Set bars for all objects.
This procedure belongs to steps 3 – 5 of the complete nesting workflow.
- Delete any incorrect machined areas.
- Change the status of objects and delete non-required objects.
- Position your objects horizontally and vertically in the top view.
- Rotate your objects about the Z-axis in the top view.
- Adjust the height position of your objects and/or rotate them about the X/Y-axis (required for multilayered blanks).
- Check if all cavities and drillings are correct.
- Specify the drilling range for objects with unrecognized drillings.
- Mark the cavities for objects with unrecognized cavities.
- Create a sinter bar for objects that require a sinter bar.
- Set drops for objects that require drops.
- Mark the attachment for objects with an attachment.
- Activate anterior tooth editing for the desired object)
- Edit or delete labels milled on objects.
- Set bars for all objects.
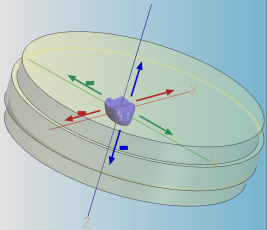
The editing function for moving and rotating objects enables you to move objects in all directions (X, Y, Z) and rotate them about all axes. While using this function, the view in the blank display is adjustable so that you can view the blank from all angles.
This function additionally allows you to do the following:
- Change the orientation of the original STL file.
- Use the keyboard to enter values for the position and rotation of objects.
Watch the video
YouTube video – When viewing this video, personal data is sent to YouTube, LLC, USA. Privacy statement
-
(Optional) Select the desired object in the blank display.
-
dentalcam highlights the object in the object list with a colored border.
-
Open the editing functions for the required object with the following icon in the left column:

-
The icon bar for the editing functions is displayed.
-
Open the editing function for moving/rotating objects with the following icon:

- In the left column, several icons and value bars for moving and rotating the object display. In the blank display, 3 colored lines indicate the 3 axes (X, Y, Z):
- X-axis: red line
- Y-axis: green line
- Z-axis: blue line
Step 1: Switching between rotating the STL files or the rotational axis
If you want to rotate an object about the X-axis or the Y-axis, there are 2 options depending on the type of machine that you use:
- If you use a 5-axis machine, dentalcnc can either rotate the second rotational axis of your machine during machining or the application can rotate the object data in the STL file.
- If you use a 4-axis machine, dentalcnc can rotate the object data in the STL file.
The differences between these options:
- If you use the second rotational axis of your machine, dentalcnc will leave the STL file untouched. However, you are limited to the mechanical rotation range of your machine (see the documentation for your machine for the exact value).
- If you adjust the STL data, you can can rotate objects to a much larger degree. However, dentalcnc will overwrite the original STL file.
When you toggle between the options, dentalcnc resets the position and orientation of the object so that all changes you made will be lost.
- Toggle the icon so that the desired rotary mode is set:
- The following happens:
- dentalcam resets the position and orientation of the object.
-
If you activated the rotation via changing the STL file:
The value bars and input boxes for rotating the object about the X- and Y-axis display for all machines.
-
If you activated the rotation via the rotational axis:
If you use a 4-axis machine, the value bars and input boxes for rotating the object about the X- and Y-axis are hidden.
For 5-axis machines all value bars are displayed.
![]()
Rotate rotational axis
![]()
Rotate STL data
Step 2: Toggling between rough alignment and fine alignment of objects
You can choose between 2 degrees of fineness for moving objects along the X-, Y- and Z-axis:
-
Rough alignment: You can move the object across the whole blank in steps of 0.5 mm with the value bars.
This is useful when speed is more important than precision.
-
Fine alignment: You can objects 5 mm in any direction with respect to their center. You can move them in steps of 0.1 mm with the value bars.
This is useful for positioning objects with extra high precision.
- Toggle the icon so that the desired rotary mode is set:
- The following happens:
-
If you selected fine aligning:
The value bars and the values in the input boxes are set in relation to the center of the object.
-
If you selected rough aligning:
The value bars and the values in the input boxes are set in relation to the blank.
![]()
Rough aligning
![]()
Fine aligning
Step 3: Moving objects in X/Y/Z-direction via icons
- (Optional) To align the view in the blank display with the X/Y/Z axis, select the following icon until the desired view direction is set:
- X:

- Y:

- Z:

- X:
-
Move the object by increasing or decreasing the value bar next to the icon.
-
Enter the movement distance in mm into the input field to the right of the value bar.


Example: Increasing/decreasing the value bar and entering the distance to move an object
-
Save your changes with the lower arrow icon:

-
Close the area for the editing function with the upper arrow icon:

Step 4: Rotating objects around the X-, Y-, Z-axis via icons
- (Optional) To align the view in the blank display with the X/Y/Z axis, select the following icon until the desired view direction is set:
- X:

- Y:

- Z:

- X:
- Rotate the object by increasing or decreasing the value bar next to the icon.
- Alternative: Enter the rotational angle into the input field to the right of the value bar.


Example: Increasing/decreasing the value bar and entering the angle to rotate an object
-
Save your changes with the lower arrow icon:

-
Close the area for the editing function with the upper arrow icon:

What's next?
Read:
Rules and recommendations for positioning objects
Next general step for adjusting objects:
