Importing STL files
How do I import STL files? Where do I select the machining quality? Can I preview objects before nesting them? Where are the calculation options?
You need to create the 3D data for the objects that you want to manufacture with an external CAD application. You then need to import these objects into DentalCAM and set the required parameters so that DentalCAM knows how to handle the objects.
Some important general rules for STL files:
- To ensure that you do not import inappropriate objects or use objects in an inappropriate way, read the information on the intended use of the software.
- To ensure that your STL files are suitable for machining, read our Help Article on avoiding common mistakes when preparing STL files.
- To ensure that DentalCAM opens the STL folders quickly, restrict the numbers of files in them and regularly remove files that are no longer needed.
- Do not use special characters and non-Latin characters for file names.
- Restrict file names to 20 characters.
- To open the STL import view, select the following icon in the main icon bar:

You can open the STL import view without selecting a blank in the blank archive first. This is useful if you want to import and prepare multiple objects before adding them to a specific blank. In this case, the import list becomes a to-do list.
The entries on the import list stay there until you add them to a blank or manually delete them. Therefore, you can always open the blank archive, select a different blank and switch back to the STL import view without losing the entries on the import list.
Manual and automatic STL import method
By default, you can manually select STL files to import them into DentalCAM.
Beside the manual import method, DentalCAM features an automatic import method.
When using the automatic STL import function, DentalCAM automatically imports files from an STL import folder and adds them to the import list in the STL import view. For this, DentalCAM periodically checks if new files have been added to the STL import folder and automatically imports any new STL files it can find. This is useful if you want to automate your STL import workflow.
Keep the following in mind:
- You can use the manual and automatic STL import method simultaneously.
- If you want to activate or deactivate the automatic STL import method, use the corresponding option in the general application setting.
- If you want to activate or deactivate the manual STL import method, use the corresponding option in the general application setting.
Workflow for the manual import method
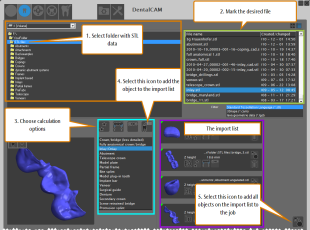
The following illustration shows the basic workflow when manually importing STL files:
To sum it up:
- Select an STL file.
- Specify the calculation options for the file.
- Add the file to the import list.
- If you selected a blank in the archive before opening the STL import view, you can add objects on the import list to the selected blank.
Watch the video
YouTube video – When viewing this video, personal data is sent to YouTube, LLC, USA. Privacy statement
DentalCAM offers 2 options for manually selecting STL files:
- About a file browserYou use a file browser to navigate to the folder with the desired files. This option gives you maximum flexibility, but if you store all your STL files in 1 folder, using the root folder may be the more convenient option.
- About a root folderIf you store all your STL files in 1 folder, set this folder as the root folder in DentalCAM. In this case, you can only select files in the root folder and its sub-folders, but you cannot change to folders higher than the root folder.

Comparison between the file browser (left) and the root folder display (right)
You can switch between the two options at any time. There are up to 3 icons in the top right corner of the STL import view for this:
Icons for STL file selection: Location
And this is what the icons do:
Icons for STL file selection: Function
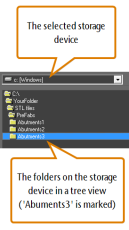
The file browser consists of 2 elements: A drop-down list to select the storage device and a tree view showing the folders on the selected device:
You select STL files via the file browser as follows:
- Activate the file browser by selecting the following icon in the top right corner of the STL import view:

- The file browser displays.
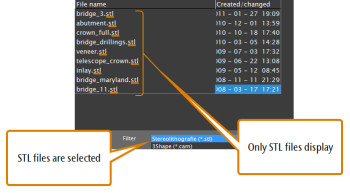
- (Optional) Select the file type for your object data from the Filter drop-down list.
- DentalCAM only lists files of the selected type in the list above the drop-down list.
- (Optional) Select the storage device from the drop-down list above the tree view. DentalCAM offers you all storage devices that Windows® has recognized. If a storage device is missing, make sure that Windows® can recognize it.
- To open a folder and list all sub-folders and files in it, double-click on the desired folder in the tree view.
- To select a file for import, mark it in the file list.
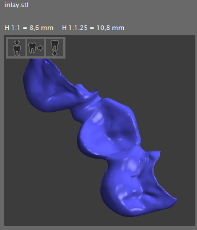
- DentalCAM previews the marked file in the bottom left corner of the STL import view. As the preview shows a full 3D model of the object, you can view it from all sides.
- Continue with specifying the calculation options.
Shortcut: You can directly add an STL file to the import list by double-clicking on it in the file list. DentalCAM will use the currently marked calculation options for the object (you can change them later in the import list). Use this feature to quickly add objects of the same type to the import list.
If you want to use a root folder for selecting STL files, you have to specify the root folder first. Then you can select files from the root folder and its sub-folders.
Watch the video
YouTube video – When viewing this video, personal data is sent to YouTube, LLC, USA. Privacy statement
Specifying the root folder
- Activate the root folder view by selecting the following icon in the top right corner of the STL import view:

- Select the following icon:

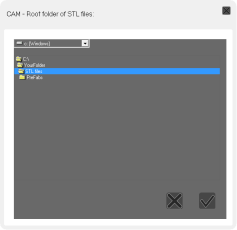
- A window for selecting the root folder opens.
- (Optional) Select the storage device from the drop-down list above the tree view. DentalCAM offers you all storage devices that Windows® has recognized. If a storage device is missing, make sure that Windows® can recognize it.
- To open a folder and list all sub-folders and files in it, double-click on the desired folder in the tree view. Repeat this until you have opened the desired folder. This folder will be set as the root folder if you confirm your changes.
- Select the following icon:

- The window closes. DentalCAM sets the selected folder as the root folder and shows its path next to the Root folder for STL files label in the STL file import view.

Root folder path display in the STL import view
Selecting STL files from the root folder
- Activate the root folder view by selecting the following icon in the top right corner of the STL import view:

- The sub-folders in the root folder display in the left column.
- (Optional) Select the file type for your object data from the Filter drop-down list.
- DentalCAM only lists files of the selected type in the list above the drop-down list.
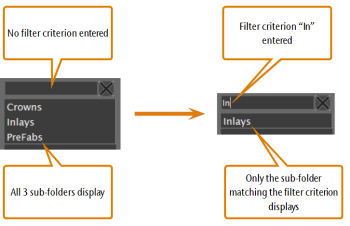
- (Optional) If there are many sub-folders in a folder and you want to filter them, enter the filter criterion into the input field above the corresponding column. You can remove a filter at any time by deleting the text from the corresponding input field.
- If you want to display the content of a sub-folder, select the desired folder in the corresponding column.
- If there are sub-folders in the selected folder, they display in the column to the right of the current column. If there are object files in the selected sub-folder, they display in the right section of the STL import view.
- To select a file for import, mark it in the file list.
- DentalCAM previews the marked file in the bottom left corner of the STL import view. As the preview shows a full 3D model of the object, you can view it from all sides.
- Continue with specifying the calculation options.
If you want to hide all columns to the right of a specific column, select the following icon above the desired column: ![]() .
.
Shortcut: You can directly add an STL file to the import list by double-clicking on it in the file list. DentalCAM will use the currently marked calculation options for the object (you can change them later in the import list). Use this feature to quickly add objects of the same type to the import list.
The STL preview allows you to inspect objects from all angles.
With the 3 icons in the top left corner of the 3D display, you can quickly switch between 3 standard views that you can find in almost any 3D design application.
- To view objects in a fixed 2D top view, select the following icon:

- To view objects in an adjustable 3D view, select the following icon:

- To view objects in an adjustable 3D view from below, select the following icon:

When working with the 3D viewer, you can use the mouse to rotate the view and zoom in and zoom out.
Moving the view in the X- and Y-direction (2D plane)
- Right-click and hold on the 3D view.
- Move the mouse into the desired direction.
- The view moves into the corresponding direction.
- Release the mouse button.
Rotating the view about a point in all 3 dimensions
- Click and hold on the desired point in the 3D view.
- Move the mouse into the desired direction.
- The view rotates about the selected point in all 3 dimensions.
- Release the mouse button.
Rotating the view about a point in 2 dimensions
While this view adjustment may not appear too useful at first glance, it can be very helpful to precisely position the view. Therefore, we really recommend trying out whether this view adjustment works for you.
|
|
|
Zooming in and out
- To zoom in or out, use the mouse wheel:
- Zoom in: Turn the mouse wheel away from you
- Zoom out: Turn the mouse wheel towards you
After manually selecting a file for import, you have to tell DentalCAM how to handle the object. You do this via the calculation options
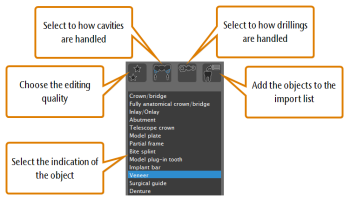
- In the selection list, mark the specification for the object file. DentalCAM needs to know the correct indication (what the job basically is) or otherwise the application cannot select the correct machining strategy for it.
- Use the left icon to select the machining qualityThe machining quality influences the path distance when machining outer surfaces. Fits, drillings and cavities are always machined with the highest quality. A higher machining quality results in finer outer surfaces, but also in a higher machining time.
- Use the Fast quality if coarse outer surfaces are sufficient. This may apply to objects which will be coated or veneered or on which you want to spend much manual work.
- Use the Optimal quality for very smooth outer surfaces. You may want to choose this option e.g., for fully anatomical objects on which you don't want to spend much manual work.
- Use the Standard quality for slightly coarse outer surfaces.
- Use the second icon to select whether DentalCAM should search for cavities To determine the machining steps for the object, DentalCAM must know the geometry and location of possible cavities of the object. The application can analyze the object and automatically find any recognizable cavities.
- If the current object has no cavities.
- If you expect the automatic search function to fail.
- Use the third icon to select whether DentalCAM should search for drillingsTo determine the machining steps for the work, DentalCAM needs to know the geometry and location of possible drillings in the object. The application can analyze the object and automatically find any recognizable drillings.
- If the current object has no drillings.
- If the object is an abutment with an angled drilling.
- If you expect the automatic search function to fail.
- To add the object to the import list, select the following icon:

- DentalCAM adds the object to the import list. You can add any object on the import list to the current or any future jobs.
- Make sure that the height of the object does not exceed the height of the blank. You can find the corresponding indicator in the import list.
The icon has 3 status which you can cycle through by selecting the icon. Following you find a table showing the icons and the corresponding quality settings.
| Icon | Description | Surface quality |
|---|---|---|
|
|
Fast |
Coarse |
|
|
Standard |
Slightly coarse |
|
|
Optimal |
Smooth |
The icon has 2 states which you can toggle by selecting the icon. Following you find a table showing the icons and the corresponding search settings.
| Icon | Search setting | When to select |
|---|---|---|
|
|
Activated |
|
|
|
Deactivated |
To save time when importing the object: Some implant-borne crowns have a drilling inside their cavity.  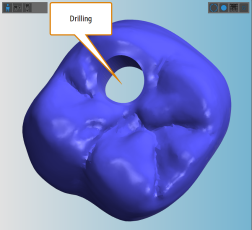 A crown with a drilling in the cavity (basal and occlusal side) If you want to know how to nest this type of objects, read our Help Article on special cases. |
The icon has 2 states which you can toggle by selecting the icon. Following you find a table showing the icons and the corresponding search settings.
| Icon | Search setting | When to select |
|---|---|---|
|
|
Activated |
|
| |
Deactivated |
To save time when importing the object: Some implant-borne crowns have a drilling inside their cavity.   A crown with a drilling in the cavity (basal and occlusal side) If you want to know how to nest this type of objects, read our Help Article on special cases. |
Workflow for the automatic import method
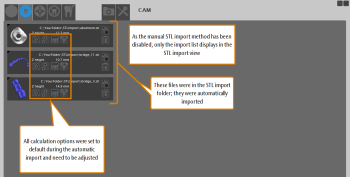
If you exclusively use the automatic import method, all control elements for the manual import method in the STL import view are hidden and only the import list displays.
If you use the automatic and manual import method simultaneously, the STL import view looks like depicted above.
The workflow for the automatic STL import at a glance:
- DentalCAM automatically imports all files in the STL import folder and puts them on the import list.
- As the calculation options for the automatically imported objects are set to default values, you need to check and specify them.
- If you selected a blank in the archive before opening the STL import view, you can add objects on the import list to the selected blank.
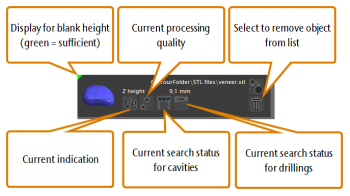
Import list
You can change the calculation options of objects that have already been added to the import list and you can also remove them from the list of course.
You will find the elements on the import list and how you can use them to change the calculation options below.
- Display for blank height and data availabilityThis indicator tells you whether the blank that you are currently editing is of sufficient height for the object and whether all data is available.
 Green: The blank is high enough and all data is available
 Yellow: All data is available, but the blank is just barely high enough (in case of a disc, the blank is between 0.3 and 0.5 mm higher than the object). Some parts of the objects may lay outside of the boundaries of the blank. Position these objects carefully in the nesting view and check whether all parts are fully enclosed by the material.
 Red: The object cannot be nested in the current blank, for example because the blank is not high enough or because XML data for prefabricated abutments is missing. Therefore, we recommend creating a new blank of sufficient height in the blank archive (<MadCap:xref href="GLB_CAM_Creating-selecting-workpieces-jobs.htm#CreateJob"><span style="font-family: 'FontAwesome';" class="mcFormatFamily"><span style="font-size: 5pt;" class="mcFormatSize"></span></span> chapter , page 1</MadCap:xref>).
 Black: You haven’t selected a blank before opening the STL import view. Therefore, DentalCAM cannot know with which blank you want to use the object.
- Current indicationThis icon indicates the current indication of the object. The icon has multiple states that you can cycle through by selecting the icon. The letters on the icons are abbreviations for the indications that you can find in the calculation options.
Following you find a table showing the icons and the corresponding indications.
| Icon | Description |
|---|---|
|
|
Abutment |
|
|
Bite splint |
|
|
Denture |
|
|
Fully anatomical crown/bridge |
|
|
Crown/bridge (less detailed) |
|
|
Occlusal screw-retained bridge |
|
|
Implant bar |
|
|
Inlay/Onlay |
|
|
Partial frame |
|
|
Model plate |
|
|
Model plug-in tooth |
|
|
Secondary crown |
|
|
Surgical guide |
|
|
Telescope crown |
|
|
TempShell |
|
|
Veneer |
- Current machining qualityThis icon indicates the current machining quality for the object. The icons and their meaning are identical to the corresponding icons in the calculation options.
The icon has 3 status which you can cycle through by selecting the icon. Following you find a table showing the icons and the corresponding quality settings.
| Icon | Description | Surface quality |
|---|---|---|
|
|
Fast |
Coarse |
|
|
Standard |
Slightly coarse |
|
|
Optimal |
Smooth |
- Current search status for cavitiesThis icon indicates whether DentalCAM searches for cavities when the object is imported. The icon has 2 states which you can toggle by selecting the icon. The icons and their meaning are identical to the corresponding icons in the calculation options.
The icon has 2 states which you can toggle by selecting the icon. Following you find a table showing the icons and the corresponding search settings.
| Icon | Search setting | When to select |
|---|---|---|
|
|
Activated |
|
|
|
Deactivated |
To save time when importing the object:
Some implant-borne crowns have a drilling inside their cavity.   A crown with a drilling in the cavity (basal and occlusal side) If you want to know how to nest this type of objects, read our Help Article on special cases. |
- Current search status for drillingsThis icon indicates whether DentalCAM searches for drillings when the object is imported. The icon has 2 states which you can toggle by selecting the icon. The icons and their meaning are identical to the corresponding icons in the calculation options.
The icon has 2 states which you can toggle by selecting the icon. Following you find a table showing the icons and the corresponding search settings.
| Icon | Search setting | When to select |
|---|---|---|
|
|
Activated |
|
| |
Deactivated |
To save time when importing the object:
Some implant-borne crowns have a drilling inside their cavity.   A crown with a drilling in the cavity (basal and occlusal side) If you want to know how to nest this type of objects, read our Help Article on special cases. |
The last step when importing STL files is to add the objects on the import list to the job. You can either add individual objects to a blank or the whole import list.
If you didn't select a blank in the blank archive before opening the STL import view, DentalCAM cannot know which blank it should add the objects to. If you try to add objects with no blank selected, you will receive an error message.
The entries on the import list stay there until you add them to a blank or manually delete them. Therefore, you can always open the blank archive, select a different blank and switch back to the STL import view without losing the entries on the import list.
