Creating or selecting jobs in the blank archive
How do I create a new blank? How do I create a new job? What is a job? How do I use the blank archive?
The blank archive contains all jobs (blanks) that are currently stored on your CAM computer![]() The computer that is connected to your machine and which runs DentalCAM and DentalCNC.. You can create new jobs or select existing ones for editing here.
The computer that is connected to your machine and which runs DentalCAM and DentalCNC.. You can create new jobs or select existing ones for editing here.
- To open the Blank archive, select the following icon in the main icon bar:

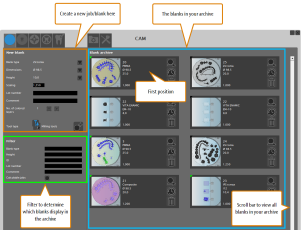
The blank archive: Overview
DentalCAM creates a separate blank archive for each machine type that can you select in the application settings. Make sure that you have selected the correct machine type to see the desired blanks.
A job contains all the data required to machine a blank: Recovery data, blank parameters, machining strategies and more. When creating a job, you start with specifying the material that you want to use, the blank size and other basic values.
Watch the video

YouTube video – When viewing this video, personal data is sent to YouTube, LLC, USA. Privacy statement
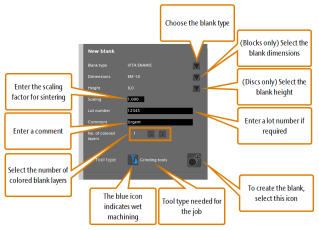
You create new jobs (blanks) in the New blank section of the blank archive.
- From the Blank type drop-down list, select the blank type for of the disc or blocks that you want to create. The list contains generic materials (e.g., PMMA) as well as brand names (e.g., VITA ENAMIC®).
Meaning of the letter after the last dash:
- D stands for discs
- B stands for blocks
- CoCr stands for prefabricated abutments made of cobalt chrome
- Ti stands for prefabricated abutments made of titanium
More information on prefabricated abutments: Supported prefabricated abutment blanks in DentalCAM 7
You will very likely not use every blank type that DentalCAM supports. To tailor the blank type list to your needs and make selecting the correct blank type faster, you can activate or deactivate each individual blank type.
- DentalCAM displays the following:
- Default values for the blank size next to the labels Dimensions and Height
- The tool type that will be used for machining the job next to the Tool type label: Either Milling tools or Grinding tools
- The following icon if the job requires wet machining:

- For blocks, select the size from the Dimensions drop-down list. The drop-down list contains the different sizes as specified by the manufacturer.
- For discs, select the height from the Height drop-down list.
- Enter the material specific scaling factor into the Scaling input field. The scaling factor is a decimal number with 3 decimal places and usually lies between 1.000 and 1.500, but can be as low as 0.500. It is published by the manufacturer of the blank.
The scaling factor determines the extent to which DentalCAM will compensate for the shrinking (in rare cases for the expansion) of objects during sintering by multiplying the size of each object in the blank by the scaling factor.
- Enter the required scaling factors for the X-, Y- and Z-direction into the 3 input fields (from left to right).
- DentalCAM scales the objects using the separate scaling factors for the 3 directions.
- If you need to assign a lot number to the blank, enter the lot number into the Lot number input field.
- (Optional) Enter a comment into the Comment input field.
- If you want to use a blank with colored layers, select the number of layers next to the Number of colored layers label:
- To increase the number of layers, select the following icon:

- To decrease the number of layers, select the following icon:

- The current number of layers displays next to the icons. The default number is 1.
- Select the following icon:

- DentalCAM assigns a unique ID number to the blank and adds it to the archive. A blank card with the blank data displays at the first position in the archive.
- If desired, edit the blank by selecting the following icon on the blank card:

- The STL import view opens where you can import objects into your job.
If you work with blocks, the selected block type applies to all blocks that are part of the job. Therefore, you can only use blocks of the same type for 1 job.
For discs, the drop-down list only contains the default diameter of 98.5 mm. You cannot change this value.
For blocks, the height is determined by the block dimensions which you selected from the Dimensions drop-down list. Therefore, you cannot change the Height value for blocks.
Example: If you enter a scaling factor of 1.200, DentalCAM multiplies the size of all objects by 1.2, which results in a size increase of 20 % for each object.
How to convert the shrink factor, scaling or shrinking values in percent to the scaling factor
Some manufacturers provide values such as the shrink factor instead of the scaling factor. Use the following widgets to convert these numbers to the scaling factor:
Example:
| Scaling factor |
Scaling [%] |
Shrink factor |
Shrinking [%] |
|---|---|---|---|
|
1.250 |
125.0 |
0.200 |
20.0 |
By default, you can only enter one value for all directions (X, Y, Z) into the Scaling input field. If the option Different scaling in X, Y, Z is activated in the application settings, the following 3 input fields display for the 3 different directions:

Scaling factors for all 3 directions
You can change the blank ID from a global sequential number to be based on the creation date of the blank in the general application settings.
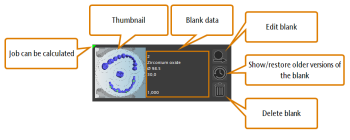
Blank cards are used in the blank archive of DentalCAM. They show basic data and a thumbnail of blanks which are currently stored on the CAM computer![]() The computer that is connected to your machine and which runs DentalCAM and DentalCNC..
The computer that is connected to your machine and which runs DentalCAM and DentalCNC..
If not all blank cards display in the blank archive, they are probably filtered out. If you cannot find some of your jobs, check the filter in the archive and remove all unwanted filter criteria.
The thumbnail only displays if at least 1 object has been added to the blank.
The blank data from top to bottom:
- ID
- Type
- Dimensions
- Height
- Lot number (if entered)
- Scaling factor(s)
All data are specified when you create a new blank.
If you only want specific blanks to display in the blank archive, you can filter them by entering the desired criteria into the input fields in the Filter section of the blank archive.
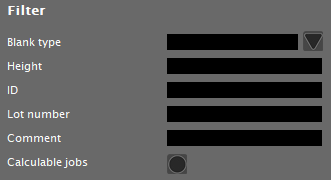
Filter in the blank archive
- Enter the desired filter criteria into the corresponding input fields. If you want to filter by the blank type, you can also select the icon to the right of the Blank type input field to select the desired blank type from a drop-down list.
- After every character you enter, DentalCAM updates the displayed blanks in the archive accordingly.
- If you only want to view jobs that can be calculated, activate the Calculable jobs check box.
- DentalCAM only displays blanks without errors which can be calculated.
All filter criteria apply together, so the more criteria you enter the less blanks will display. You should especially keep this in mind when entering a blank ID as a filter criterion. As every ID usually only occurs once, only 1 blank is permitted to display. However, DentalCAM continues to apply all other criteria as well so that the desired blank is likely to not display at all.
Let's imagine the following situation: You’ve nested objects in a blank and then DentalCAM calculated the job. Before manufacturing, you realize that you need to edit the blank again.
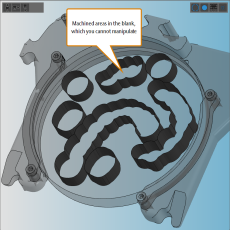
Therefore, you select the calculated blank in the blank archive, open the the nesting view and see the following:
What has happened here? As DentalCAM does not communicate with your machine (only DentalCNC does), the application does not know if a calculated job has actually been machined. Therefore, it assigns the same preset status to all calculated objects. The default status for calculated objects is Already machined and therefore, calculated objects display as machined areas.
If you use the residual material display regularly to check objects before machining, we recommend setting the preset state of objects to Machine so that you can edit them after calculation.
In the scenario described above, the blank is still intact as it has never been used. So you need to revert the blank back to the state where the original objects are still in the blank. To do this, you can create a copy of an older version of the blank, edit this copy and have it calculated.
Creating a copy of an older version of a blank via the blank history
Only if you set the status for calculated objects to Already machined, will DentalCAM save old versions of jobs that you can restore to edit calculated objects again. If you activate a different preset status, you can edit calculated objects by opening the desired blank in the nesting view.
When DentalCAM calculates a job, the application saves a copy of the blank in the state before the calculation. As you can edit and calculate every job multiple times, multiple old versions of each blank can exist in your archive. You can select any of those older versions and create a copy of it.
To create a copy of an older version of a blank, do the following:
- On the desired blank card, select the following icon:

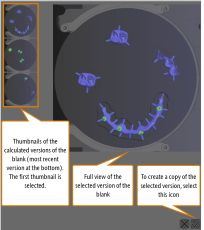
- A windows opens where the older versions of the blank display as thumbnails. The first version that was calculated displays at the top and newer versions display below in the order they were calculated.
- Select the version of the blank that you want to create a copy of.
- A full view of the selected blank displays on the right side of the window.
- Select the following icon:

- The window closes and DentalCAM creates a copy of the selected version of the blank under the original blank ID. You can edit the blank like any other blank.
If you no longer need a blank in the archive, you can permanently delete it including all older versions that may exist. This cannot be undone.
