Setting up multi-machine control
If you want to control multiple machines with 1 CAM computer![]() The computer that is connected to your machine and which runs dentalcam and dentalcnc., use our multi-machine control feature.
The computer that is connected to your machine and which runs dentalcam and dentalcnc., use our multi-machine control feature.
With this feature, you can use up to 3 machines with 1 CAM computer![]() The computer that is connected to your machine and which runs dentalcam and dentalcnc.. For this, you need to install multiple copies of the manufacturing software
The computer that is connected to your machine and which runs dentalcam and dentalcnc.. For this, you need to install multiple copies of the manufacturing software![]() Term for the software package consisting of dentalcam and dentalcnc. on the computer which will be started via different colored icons.
Term for the software package consisting of dentalcam and dentalcnc. on the computer which will be started via different colored icons.
- Machines of the E series require a version of dentalcnc from 8.10 onwards. If you are updating the program from an older version, please refer to Multi-machine control from dentalcnc 8.10 onwards.
- The multi-machine control cannot be used together with the 3Shape Produce workflow.
- You need to obtain a separate dentalcam license for every machine.
- The multi-machine control feature significantly increases the system requirements of the CAM computer
 The computer that is connected to your machine and which runs dentalcam and dentalcnc..
 - You can use the different copies of dentalcam and dentalcnc simultaneously if your computer has enough processing power and working memory.
- We recommend using this function to control one 5-axis machine and one 4-axis machine with the CAM computer
 The computer that is connected to your machine and which runs dentalcam and dentalcnc..
This Help Article requires you to be able to configure a connection between dentalcnc and the machines.
Establishing the connection between dentalcnc and your machine
Multi-machine control from dentalcnc 8.10 onwards
The multi-machine control was revised for dentalcnc 8.10. For technical reasons, however, the function stays at the old status when it is updated.
If you want to add machines from dentalcnc 8.10 onwards:
-
Re-install the latest version of dentalcam & dentalcnc .
-
Start with the following instructions at the step Setting up the first machine.
Setting up the first machine
- Connect the CAM computer
 The computer that is connected to your machine and which runs dentalcam and dentalcnc. to your first machine.
 - Install dentalcam and dentalcnc.
- Configure dentalcnc so that it can connect to the machine. This is the first copy of the manufacturing software
 Term for the software package consisting of dentalcam and dentalcnc..
 -
The machine references.
The first copy is now linked to the first machine. To work with the first machine, you need to start dentalcam or dentalcnc via the red icons.
- Configure the first copy (instance) of the software::
-
Open the dentalcncApplication settings with the following icon in the main toolbar:

-
Open the General settings with the following icon on the local toolbar:

-
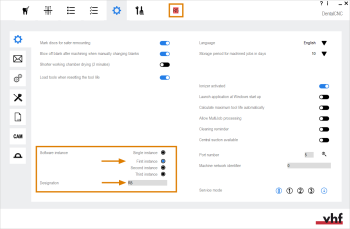
Locate the Software instance options.
-
Recommendation: Activate the First instance option.
The instance number determines the color coding in the title bar. The color coding should match the desktop icons.
-
First instance: Red
-
Second instance: Blue
-
Third instance: Green
-
-
Enter the machine name in the Designation input field.
-
The machine name displays in the title bar. The red background color indicates that this is the first instance.
-
Close dentalcam and dentalcnc.
-
Switch off the first machine.
If you don't switch off the first machine at this point, the multi-machine setup will fail.
Setting up the second machine
-
Connect the CAM computer
 The computer that is connected to your machine and which runs dentalcam and dentalcnc. to the second machine. Switch on the second machine.
 -
Install the manufacturing software
 Term for the software package consisting of dentalcam and dentalcnc. again into a different folder.
 -
Machines that use the SX Virtual Link to establish a connection:
Manually establish the connection via SX Virtual Link, as described in the operating instructions.
-
Open Windows® Explorer.
-
Navigate to the installation folder
 The folder on your hard drive that you installed dentalcam and dentalcnc in. of the second copy of the manufacturing software
 Term for the software package consisting of dentalcam and dentalcnc..
 -
Open the USB\Multi-Machine Control folder.
-
Open the file for the machine to be integrated:
-
E3, E4, E5: Double-click the Blue_CAM_net.bat file.
-
All other machines: Double-click the Blue_CAM.bat file.
-
-
If Windows asks you whether Microsoft Windows Based Script Host may make changes to your system, select Yes. Otherwise, the desktop icons will not be created for the current user.
-
Machines that use the SX Virtual Link to establish a connection:
Manually disconnect the connection to the machine via the SX Virtual Link.
-
Start the second copy of dentalcnc via the blue icons. Configure dentalcnc so that it can connect to the second machine.
-
The following happens:
-
The machine references.
-
The second copy of the software is now linked to the second machine.
-
The copy is preconfigured with default values in dentalcnc.
-
If you want to change the preconfigured default values, configure the second copy (instance) of the software:
-
Open the dentalcncApplication settings with the following icon in the main toolbar:

-
Open the General settings with the following icon on the local toolbar:

-
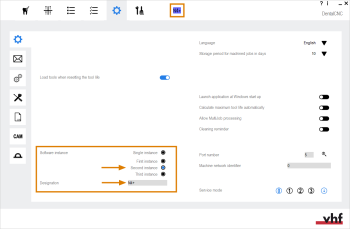
Locate the Software instance options.
-
To change the color coding in the title bar, select the desired option:
-
First instance: Red
-
Second instance: Blue
-
Third instance: Green
Recommendation: The color coding should match the desktop icons.
-
-
Enter the machine name in the Designation input field.
-
The machine name is displayed together with the selected color in the title bar.
Setting up the third machine
- Switch off the first and second machine.
- Connect the third machine to your CAM computer
 The computer that is connected to your machine and which runs dentalcam and dentalcnc. and switch it on.
 -
Install the manufacturing software
 Term for the software package consisting of dentalcam and dentalcnc. again into a different folder.
 -
Machines that use the SX Virtual Link to establish a connection:
Manually establish the connection via SX Virtual Link, as described in the operating instructions.
- Open Windows® Explorer.
-
Navigate to the installation folder
 The folder on your hard drive that you installed dentalcam and dentalcnc in. of the third copy of the manufacturing software
 Term for the software package consisting of dentalcam and dentalcnc..
 -
Open the USB\Multi-Machine Control folder.
-
Open the file for the machine to be integrated:
-
E3, E4, E5: Double-click the Blue_CAM_net.bat file.
-
All other machines: Double-click the Blue_CAM.bat file.
-
-
If Windows asks you whether Microsoft Windows Based Script Host may make changes to your system, select Yes. Otherwise, the desktop icons will not be created for the current user.
-
Machines that use the SX Virtual Link to establish a connection:
Manually disconnect the connection to the machine via the SX Virtual Link.
-
Start the third copy (instance) of dentalcnc via the green icons. Configure dentalcnc so that it can connect to the third machine.
- The following happens:
-
The machine references.
-
The third copy is now linked to the third machine.
-
The copy is preconfigured with default values in dentalcnc.
-
If you want to change the preconfigured default values, configure the third copy (instance) of the software:
-
Open the dentalcncApplication settings with the following icon in the main toolbar:

-
Open the General settings with the following icon on the local toolbar:

-
Locate the Software instance options.
-
To change the color coding in the title bar, select the desired option:
-
First instance: Red
-
Second instance: Blue
-
Third instance: Green
Recommendation: The color coding should match the desktop icons.
-
-
Enter the machine name in the Designation input field.
-
The machine name is displayed together with the selected color in the title bar.

