Integrating exocad ChairsideCAD
For CAD/CAM integration of exocad ChairsideCAD with other machines, see Setting up CAD/CAM integration.
This CAD application writes its data to the following data folder on the CAM computer![]() The computer that is connected to your machine and which runs dentalcam and dentalcnc.:
The computer that is connected to your machine and which runs dentalcam and dentalcnc.:
C:\CADshare\DentalNestingObjToMDW
The folder is already created at machine delivery and shared on the network.
Overview
-
Download the script for integration on the CAD computer.
-
Run the script on the CAD computer. Enter the required information.
-
Save the path to the shared data folder on the CAM computer
 The computer that is connected to your machine and which runs dentalcam and dentalcnc. in dentalcnc.
 -
Save the path to the shared data folder on the CAD computer in exocad ChairsideCAD.
Integration
Configuring the CAD computer
-
Open our download portal: https://www.dentalportal.info/community/filebase/category-file-list/3-z4/
-
Download the CAD/CAM integration script to the CAD computer.
- The script is stored on the CAD computer inside a ZIP file
 A compressed file which contains multiple other files. Has the .ZIP file extension. ZIP files must be unzipped before use..
 -
Unpack the ZIP file
 A compressed file which contains multiple other files. Has the .ZIP file extension. ZIP files must be unzipped before use. (e.g. to the Desktop).
 - The script file is stored under the following name:
-
Run the script.
- A window opens. The script prompts you to enter the machine serial number.
-
Enter the machine serial number. Press Enter.
- The following happens:
-
A network drive is mapped to the shared data folder on the CAM computer
 The computer that is connected to your machine and which runs dentalcam and dentalcnc..
 -
The login credentials for the network share and remote desktop access are stored on the CAD computer.
-
Record the drive letter for the network drive.
-
Press any key.
- The current window closes. The script has finished.
CAD-CAM_Integration_Exocad.cmd
Identification plate and serial number
For this, the first available drive letter on the CAD computer is used.
Example: If Z is the first available drive letter, you will be able to access the shared data folder on the CAM computer![]() The computer that is connected to your machine and which runs dentalcam and dentalcnc. by opening the Z: drive on the CAD computer.
The computer that is connected to your machine and which runs dentalcam and dentalcnc. by opening the Z: drive on the CAD computer.
Setting up dentalcnc
-
Access the CAM computer
 The computer that is connected to your machine and which runs dentalcam and dentalcnc..
 -
Switch to dentalcnc.
-
Open the dentalcncApplication settings with the following icon in the main toolbar:

-
Open the General settings with the following icon on the local toolbar:

-
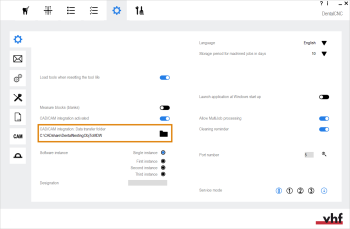
Check if the following folder path displays under the CAD/CAM integration: Data transfer folder label:
 To store the data transfer folder in dentalcnc, select the depicted icon to the right of the CAD/CAM integration: Data transfer folder label.
-
A window for selecting the folder opens.
- From the drop-down list, select the drive letter c:.
- Select the following folder:
CADshare\DentalNestingObjToMDW
 Select the depicted icon.
- The selected folder displays below the CAD/CAM integration: Data transfer folder label.
C:\CADshare\DentalNestingObjToMDW
If it doesn’t, do the following:
Setting up exocad ChairsideCAD
-
In Windows® Explorer, open the exocad ChairsideCAD folder.
-
Change into the config folder.
-
Open the following file with a text editor:
-
Inside the file, find the following expression (“tag”):
-
Replace the output path with the letter of the network drive that you recorded followed by a colon (:).
-
Save and close the XML file.
settings-chairside.xml
<NestingInterop2TemporaryFolder>
Directly behind the expression, you will find the exocad output path.
Example: You recorded the drive letter Z. The expression in the XML file must be:
<NestingInterop2TemporaryFolder>Z:</NestingInterop2TemporaryFolder>
