Applies to: dentalcam & dentalcnc 8.12
Error code 63 – Input stop
dentalcnc aborts the job and displays the error code.
Interactive troubleshooting guide
Is the safety cover attached behind the upper service cover?
How to check this:
-
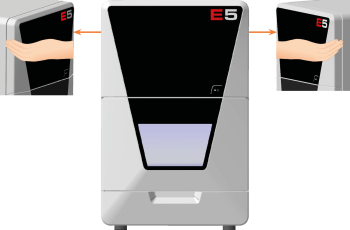
Remove the top service cover:
-
Grasp the recess on the left and right sides of the service cover.
-
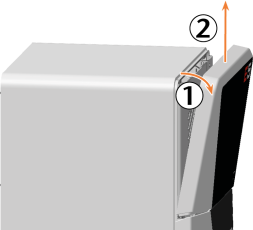
Lift the service cover out of the tabs.
-
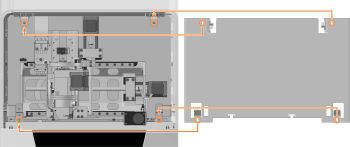
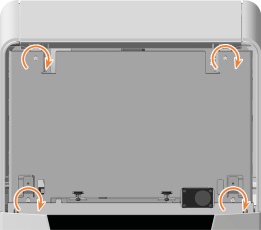
Check if the safety cover (marked orange) is attached.
Are the screws of the safety cover tightened such that the safety cover is firmly seated?
Are the screws of the end switch for the safety cover tightened to 1.5 Nm?
How to check this:
-
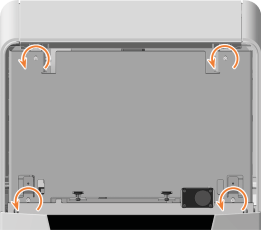
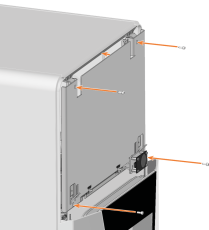
Use the 1.5 Nm torque screwdriver to unscrew the 4 screws that secure the safety cover.
-
Remove the safety cover.
-
Check if the screws (marked orange) of the end switch are tight.
Are the screws fixing the end switch holder in place tight?
What is the result of manually activating the end switch?
How to check this:
-
Close dentalcnc
-
Switch off the machine at the main power switch.
-
Wait 5 seconds.
-
Switch on the machine at the main power switch.
-
Start dentalcnc.
-
Press the bracket (marked orange) of the end switch against the pushbutton until you hear a click.
Hold the bracket in this position until the machine references or the working chamber lighting turns red.
Does the error occur again after attaching the safety cover?
How to check this:
-
Close dentalcnc
-
Switch off the machine at the main power switch.
-
Position the safety cover so that the 4 screw holes are located above the 4 screw holes in the machine housing.
-
Secure the safety cover to the machine housing using the 1.5 Nm torque screwdriver.
-
Switch on the machine at the main power switch.
-
Start dentalcnc.
Recommendation
-
Close dentalcnc
-
Switch off the machine at the main power switch.
-
Position the safety cover so that the 4 screw holes are located above the 4 screw holes in the machine housing.
-
Secure the safety cover to the machine housing using the 1.5 Nm torque screwdriver.
-
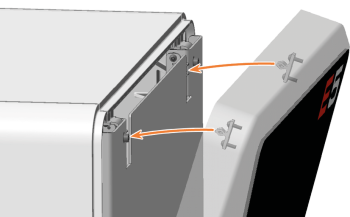
Attach the top service cover:
-
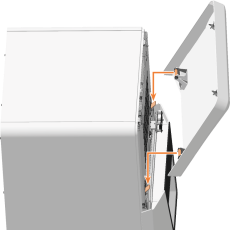
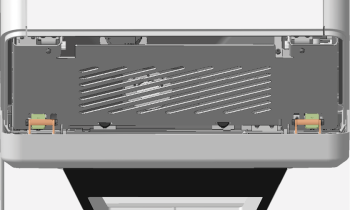
Insert the bolts (marked orange) of the service cover into the holders (marked green) on the safety cover.
-
Tilt the service cover towards the machine until it clicks into place.
-
Recommendation
-
Tighten the 4 screws of the safety cover with the torque screwdriver 1.5 Nm.
-
Check the tight fit of the safety cover.
Recommendation
-
Loosen the screws of the end switch holder until you can align it.
-
Align the limit switch holder such that the safety cover presses the bracket of the end switch against the pushbutton. To do this, attach the safety cover as a test.
-
Tighten the screws of the end switch holder firmly.
-
Position the safety cover so that the 4 screw holes are located above the 4 screw holes in the machine housing.
-
Secure the safety cover to the machine housing using the 1.5 Nm torque screwdriver.
-
Close dentalcnc
-
Switch off the machine at the main power switch.
-
Wait 5 seconds.
-
Switch on the machine at the main power switch.
-
Start dentalcnc.
-
The machine references. The problem should be resolved.
-
Attach the top service cover:
-
Insert the bolts (marked orange) of the service cover into the holders (marked green) on the safety cover.
-
Tilt the service cover towards the machine until it clicks into place.
-
Recommendation
The end switch is probably defective.
-
Contact customer service.
Recommendation
-
Contact customer service.
