Clean or exchange the coupling of the cooling liquid tank
Watch the video
YouTube video – When viewing this video, personal data is sent to YouTube, LLC, USA. Privacy statement
Cleaning the coupling of the cooling liquid tank
-
Clean the cooling liquid tank and remove the cooling liquid filter.
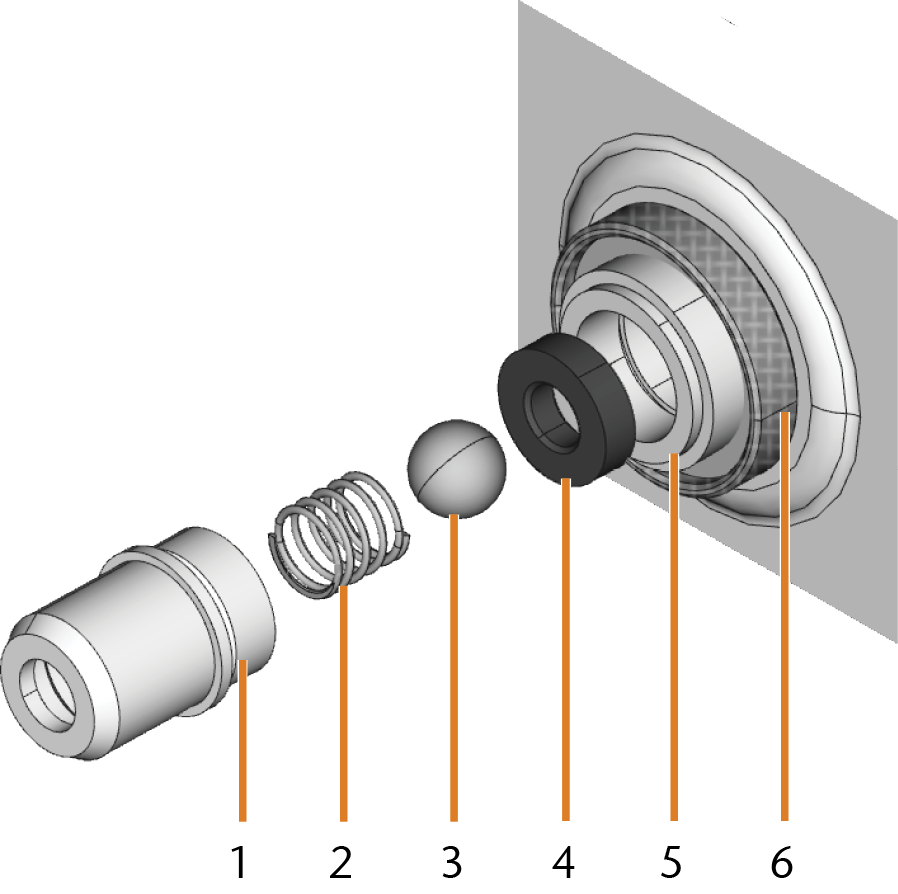
- Unscrew the cap [1] of the coupling by hand. Do not unscrew the nut [6] that fixates the coupling to the tank.
- Remove the valve spring [2], ball [3] and valve seat [4] from the socket [5] and the cap [1] of the coupling.
- Cap of the coupling
- Valve spring
- Ball
- Valve seat
- Socket of the coupling
- Fixing nut (do not unscrew during cleaning)
- Rinse the disassembled components of the coupling under running water and dry them with a cloth.
- Place the valve seat in the socket of the coupling.
- Place the spring in the cap of the coupling.
- Position the ball in the valve seat and screw the cap onto the socket of the coupling.
-
Install the cooling liquid filter and refill the tank.
Exchanging the coupling of the cooling liquid tank
- Empty the cooling liquid tank.
- While holding the coupling of the cooling liquid tank from the outside with one hand, unscrew the filter of the cooling liquid tank with the other hand.
- Put the filter aside.
- While holding the coupling of the cooling liquid tank from the outside with one hand, unscrew the nut with which the cooling liquid tank is fixated with the other hand.
- Push the coupling out of the tank.
-
Thoroughly clean the cooling liquid tank. Especially clean the sealing surface around the opening for the coupling. Otherwise the cooling liquid tank may leak.
- Insert the spare coupling into the designated opening as shown in the following figure.
-
Screw down the nut onto the coupling by hand. Do not tighten the nut completely yet.
- Reinsert the cooling liquid tank until the tank is properly attached to the machine.
- Pull the cooling liquid tank out of the machine again.
- Fully tighten the nut and screw down the filter onto the coupling by hand.
- Fill new cooling liquid into the tank.
- Reinsert the cooling liquid tank until the tank is properly attached to the machine.
NOTICE! Damage to the coupling due to premature tightening of the filter