Applies to: N4
Cooling liquid tank upgrade kit
How do I upgrade the cooling liquid tank? How do I use the upgraded cooling liquid tank?
These instructions describe how to install and use the following spare part:
Cooling liquid tank upgrade kit – Spare part 253331
This document is also available as a PDF document. Download at:
Upgrade kit overview
You should have received the following items with your upgrade kit:
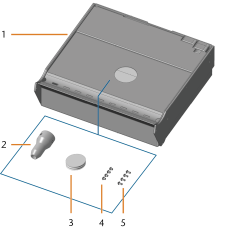
Cooling liquid tank upgrade kit (accessories delivered in the tank)
- 1 x Cooling liquid tank
- 1 x Cooling liquid tank adapter with check valve
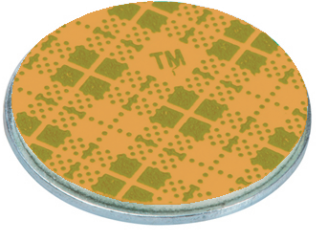
- 1 x Self-adhesive magnetic bonding disc (for the magnet of the cooling liquid tank)
- 4 x Oval-head screw (M4 x 5)
- 4 x Oval-head screw (M4 x 8)
Not depicted:
3 x Fine filter
1 x Tank with activated carbon, sufficient for 3 months (approx.)
Preparing the exchange
- Have ready:
- Hexagon screwdriver (3 mm)
- Degreasing cleaning agent
- Wet cloth
- Dry cloth
- Close the working chamber door.
- Switch off the machine at the main power switch.
Replacing the cooling liquid tank
First you need to remove the existing cooling liquid tank before you can install the cooling liquid tank conversion kit.
After preparing the exchange, continue as follows:
- Open the cooling liquid tank.
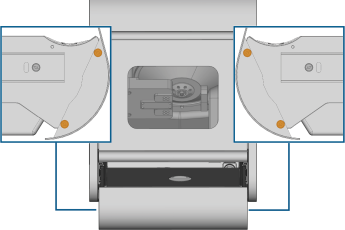
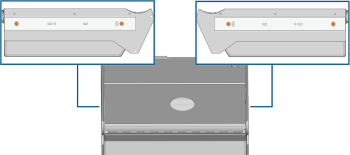
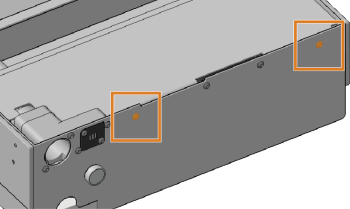
- Remove the cooling liquid tank cover by unscrewing the 4 screws (marked orange) at the left and right side of the cover. Keep the cover in a safe place.
- Remove the cooling liquid tank by doing the following:
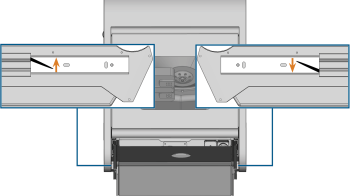
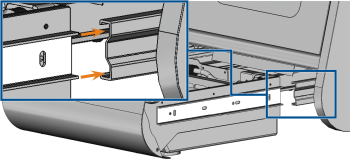
- Pull the lever in the left guide rail up and push the lever in the right guide rail down. Keep both levers in that position.
- Pull the tank completely out of the machine.
- Empty the cooling liquid tank and place it on an even surface.
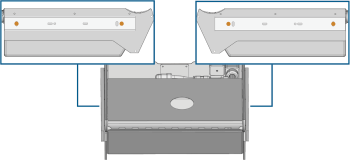
- Remove the guide rails from the tank by unscrewing the 4 fixing screws (marked orange) at the left and right side of the tank. Keep the guide rails in a safe place.
- You have successfully removed the cooling liquid tank.
- Carefully place the check valve in the adapter for the cooling liquid tank with the smaller opening facing forward. Push the check valve as far as possible into the adapter.
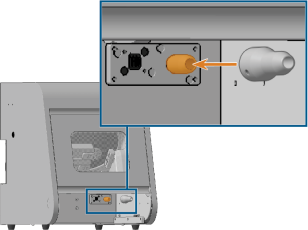
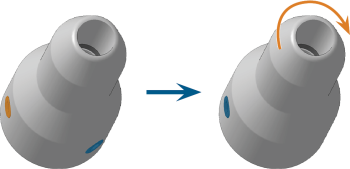
- Place the cooling liquid tank adapter on the coupler plug (marked orange) of the machine.
- To fixate the cooling liquid tank adapter, do the following:
- Loosely screw in one screw (marked orange) of the adapter.
- Rotate the adapter and completely screw down the other screw (marked blue).
- The cooling liquid tank adapter is fixated to the machine.
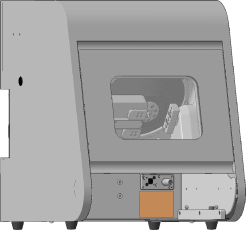
- Clean and degrease the surface (marked orange) below the coupler plug with a suitable cleaning agent and dry it with a cloth.
- Mount the guide rails on the cooling liquid tank of the conversion kit by doing the following:
- Place a guide rail with its flat part on the left side of the tank. Ensure that the open end points to the back of the tank and the first and last hole are aligned with the bores in the tank.
- Screw down the guide rail with 2 short fixing screws (marked orange).
- Repeat the previous two steps with the right side of the tank.
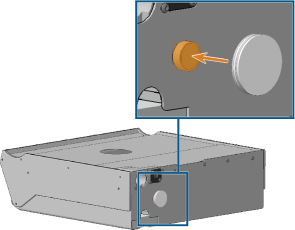
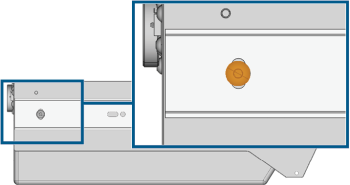
- Attach the metal side of the magnetic bonding disc to the magnet (marked orange) at the back of the cooling liquid tank. Align the disc with the center of the magnet.
- Remove the protective film (marked orange) from the self-adhesive side of the magnetic bonding disc.
- Insert the cooling liquid tank into the guide rails of the machine and push it into the machine. Push the tank firmly closed, so that the magnetic bonding disc is pressed onto the machine body.
- Check if the tank opens / closes smoothly and the coupling connects properly.
- If necessary, adjust the angle of the guide rails via the screws (marked orange) and slotted holes towards the back of the tank.
- If necessary, adjust the coupling by doing the following:
- Remove the cooling liquid tank.
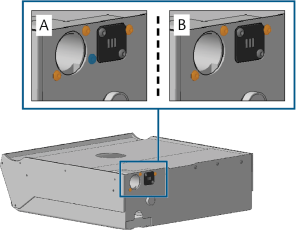
- Variant A: Loosen the 3 screws (marked orange) and the grub screw (marked blue) of the coupling a little.
- Variant B: Loosen the 3 screws (marked orange) of the coupling a little.
- Insert the cooling liquid tank into the guide rails of the machine and push the tank into the machine. Push the tank firmly closed.
- Remove the cooling liquid tank, screw the screws (marked orange) back in and reinsert the tank.
- Screw down the cooling liquid tank cover with 4 long fixing screws (marked orange) at the left and right side of the cover.
- Update DentalCAM & DentalCNC to Version 8.01 or higher and activate the upgraded cooling liquid tank in the Machine data view in DentalCNC.
- You have successfully installed the cooling liquid tank conversion kit.
The surface needs to be dry and free from residues, otherwise the adhesive of the magnetic bonding disc may not adhere sufficiently to the machine.
Depending on your version of the cooling liquid tank there are 4 screws (A) or 3 screws (B) that fixate the coupling of the tank.
The cooling liquid pump of the upgraded cooling liquid tank has an increased maintenance interval (2,000 operating hours instead of 250). To adjust the maintenance interval in DentalCNC, you need to update DentalCAM & DentalCNC to Version 8.01 or higher and activate the tank in DentalCNC.
Using the upgraded cooling liquid tank
The upgraded cooling liquid tank provides an improved cooling liquid pump, a new cooling liquid filter (including carbon filter) and a sponge that collects leaking liquid below the coupling of the tank.
While the general handling of the upgraded cooling liquid tank is identical to the standard tank, there are some differences that are described below. An updated maintenance table lists all maintenance tasks for N4 machines with upgraded cooling liquid tank. Maintenance table
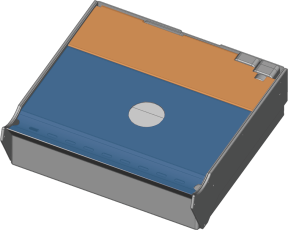
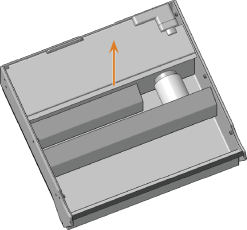
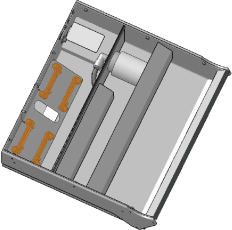
There are 2 separate compartments in the upgraded cooling liquid tank. Only the front compartment (marked blue) is designed to hold cooling liquid. The cooling liquid filter is located here. In the rear compartment (marked orange) the cooling liquid pump is located.
Damage to the pump if you fill cooling liquid into the rear compartment of the tank
If you fill cooling liquid into the rear compartment of the cooling liquid tank, the cooling liquid pump can get damaged.
- Only remove the cover of the rear compartment when you are exchanging the cooling liquid pump.
- Never fill cooling liquid into the rear compartment of the tank.
With the upgraded cooling liquid tank, exchanging the cooling liquid includes rinsing the cooling liquid filter and the cooling liquid sponge.
- When exchanging the cooling liquid, do the following:
- Empty and clean the cooling liquid tank.
- Rinse the filter in the cooling liquid tank under running water.
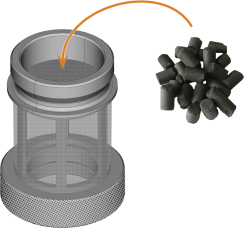
You can disassemble the cooling liquid filter to clean it thoroughly. Replace carbon pellets
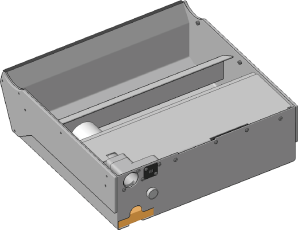
- Pull the cooling liquid sponge (marked orange) out of the slot at the lower backside of the cooling liquid tank.
- Rinse the sponge under running water.
- Wring the sponge out. Let it dry.
-
Insert a dry sponge into the slot.
- If the filter or the sponge are very soiled or worn, exchange them.
To exchange the carbon pellets and clean the filter, do the following:
- Empty and clean the cooling liquid tank.
- Unscrew the filter in the cooling liquid tank by hand and remove the filter.
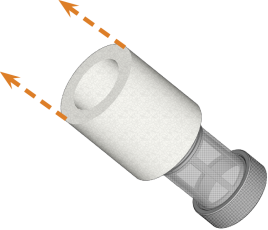
- Remove the fine filter by stretching the top end slightly and pulling it straight off the filter with both hands.
- Clean the fine filter under running water. If the fine filter is too soiled for proper cleaning, exchange it with a new one when reassembling the filter.
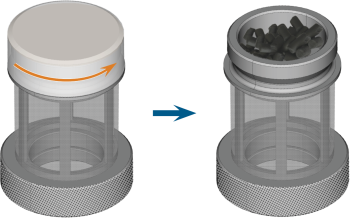
- Screw the cap of the carbon filter off the filter.
- Empty the filter and dispose of the carbon pellets.
- If the mesh filter is soiled, clean it under running water.
- Clean the carbon filter and dry it with a cloth.
- Fill new carbon pellets into the carbon filter.
- Firmly close the carbon filter with the cap.
- Reassemble the cooling liquid filter. Make sure that the fine filter covers the complete filter. If the fine filter is too long, cut it to the length of your cooling liquid filter.
- Screw down the filter in the cooling liquid tank by hand.
- Fill new cooling liquid into the tank.
- Reinsert the cooling liquid tank until the tank is properly attached to the machine.
- Remove the cooling liquid tank completely.
- Empty and clean the cooling liquid tank.
- Put the cooling liquid tank onto a firm and even surface.
- Unscrew the 2 screws (marked orange) that fixate the cover of the rear compartment of the cooling liquid tank.
- Lift the cover off the rear compartment.
- Disconnect the cable of the cooling liquid pump from the cable in the cooling liquid tank.
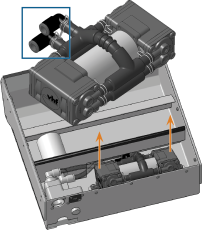
- Pull the cooling liquid pump out of the cooling liquid tank and unplug the hoses from the hose connectors (marked blue) of the pump.
- If necessary, exchange the pump holders in the cooling liquid tank.
- Plug the hoses into the connectors of the spare cooling liquid pump.
- Push the spare cooling liquid pump onto the holders in the cooling liquid tank.
- Connect the cable of the spare cooling liquid pump to the cable in the cooling liquid tank.
- Place the cover on the rear compartment and screw it down with the 2 screws.
Following you find the maintenance table for N4 machines with upgraded cooling liquid tank. It replaces the maintenance table in the original operating instructions.
Several times per day
| Action | Recommended interval / Terms | Procedure / Tools |
|---|---|---|
|
Check the external pneumatic hoses for damage |
Before switching on the machine |
Visual check |
|
Check the cooling liquid |
Before every wet machining If the flow rate is insufficient |
Visual check; exchange liquid if necessary |
Once per day
| Action | Recommended interval | Procedure / Parts | Tool illustration |
|---|---|---|---|
|
Checking the compressed air regulator |
Before work
|
|
|
|
Daily cleaning of the working chamber |
After work
|
Wet cloth |
|
|
Exchanging the cooling liquid and cleaning the cooling liquid tank
|
10 – 20 operating hours |
Brush, Water, Cooling liquid, Tec Liquid Pro |
 |
Once per week
| Action | Recommended interval | Procedure / Parts | Tool illustration |
|---|---|---|---|
|
Cleaning the collet chuck |
Once per week
|
Spindle service set, Collet chuck grease, Interdental brush |
 |
Every 4 weeks
| Action | Recommended interval | Procedure / Parts | Tool illustration |
|---|---|---|---|
|
Exchange filter: Every 4 weeks Order new pellets: Every 3 months |
When necessary
Wear parts that you can exchange yourself
Wear parts that customer service exchanges for you
| Wear part | Recommended interval | Procedure / Parts | Spare part illustration |
|---|---|---|---|
|
Spindle bearings (requires spindle exchange by customer service) |
2,000 operating hours* |
|
 |
*These are recommendation guidelines. Depending on the processing material and how well the machine is cleaned, these values may differ.
The cooling liquid pump of the upgraded cooling liquid tank has an increased maintenance interval (2,000 operating hours instead of 250). To adjust the maintenance interval in DentalCNC, you need to update DentalCAM & DentalCNC to Version 8.01 or higher and activate the tank in DentalCNC.
