Application settings of DentalCNC
Where are the settings of DentalCNC? How do I establish a connection to the machine? Where can I configure machining?
The application settings of DentalCNC enable you to set important parameters which influence your machining workflow.
Like other functions in DentalCNC, the settings are machine-specific. If you don't see a specific setting, it is not available for your machine.
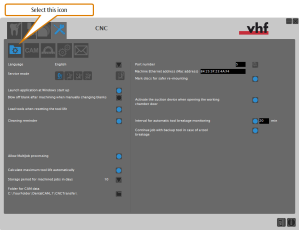
- Open the DentalCNC Application settings. For this, select the following icon in the main icon bar:

- Open the General settings. For this, select the following icon in the lower icon bar:

- The general settings of DentalCNC display.
- From the Language drop-down list, select the desired user interface language.
If you activate this option, DentalCNC will automatically launch every time you (re-)start your CAM computer![]() The computer that is connected to your machine and which runs DentalCAM and DentalCNC.. If you use the Z4, you need to activate this option for the automatic connection process to work.
The computer that is connected to your machine and which runs DentalCAM and DentalCNC.. If you use the Z4, you need to activate this option for the automatic connection process to work.
If you use a different machine, you may want to activate this option if it is more convenient for you.
- If you want the machine to remove the coarse dust from the blank after machining using compressed air, activate the Blow off blank after machining when manually changing blanks option.When using the blank changer
 Machine component which stores multiple blanks in a magazine and which can automatically load them into the working chamber.. When using the search, use a blank changer or a blank magazine instead, the machine will always blow off the blanks before they are automatically unloaded into the blank magazine
 Part of the blank changer in which you store the blanks for automatic loading.. Therefore, this option only applies to machines without a blank changer
 Machine component which stores multiple blanks in a magazine and which can automatically load them into the working chamber.. When using the search, use a blank changer or a blank magazine instead and to machines with a blank changer
 Machine component which stores multiple blanks in a magazine and which can automatically load them into the working chamber.. When using the search, use a blank changer or a blank magazine instead that allow a manual blank change.
 - After machining, the spindle moves above the blank and blows it off with the air nozzles.
If you reset tool life values, you usually exchange the corresponding tool at the same time. DentalCNC can assist you with this by automatically unloading the old tool from the tool magazine and loading the new tool into the appropriate tool magazine position. In this case, you only need to manually insert the new tool into the collet chuck of the spindle. This is useful if you do not want to bother with finding the right tool in the tool magazine and inserting the new tool.
You can only automatically load tools when you reset the tool life in the Machining view.
- If you want to automatically load tools when resetting the tool life, activate the Load tools when resetting the tool life option.
Cleaning your machine is very important for a long service life.
- If you want DentalCNC to be reminded regularly that cleaning is due, activate the Cleaning reminder option.
The MultiJob function allows you to machine multiple jobs with the same ID using only 1 blank.
- To activate the Multijob function, activate the Allow MultiJob processing option.
Keeping track of tool life values is one of the major functions of DentalCNC.
The formula is:
Maximum tool life — Operating time = Remaining tool life
You can manually enter the maximum tool life for each tool type in the Tool list in the DentalCNC settings.
In addition, DentalCNC can calculate the maximum tool life based on the maximum tool life values which have been achieved in the past.
- If you want DentalCNC to calculate the maximum tool life for each tool type, activate the Calculate maximum tool life automatically option.
- Every time you reset the tool life of a tool, DentalCNC uses the operating time that was actually achieved with the tool to re-calculate the maximum tool life of the corresponding type. The application updates the tool list accordingly.
You can manually overwrite tool life values which DentalCNC calculated, but as long as the Calculate maximum tool life automatically option is activated, the application will overwrite the manually adjusted values every time you reset the corresponding tool life.
Jobs are removed from the job list in the machining view after they have been machined, but their data are not immediately removed from the CAM computer![]() The computer that is connected to your machine and which runs DentalCAM and DentalCNC.. This enables you to restore machined jobs via the job archive so that they display in the job list again. As job data take up a significant amount of disc space, DentalCNC automatically removes the data after a specific time period. You can specify this time period in the general application settings of DentalCNC.
The computer that is connected to your machine and which runs DentalCAM and DentalCNC.. This enables you to restore machined jobs via the job archive so that they display in the job list again. As job data take up a significant amount of disc space, DentalCNC automatically removes the data after a specific time period. You can specify this time period in the general application settings of DentalCNC.
- From the Storage period for machined jobs in days drop-down list, select the number of days after which DentalCNC should delete the job data from the CAM computer
 The computer that is connected to your machine and which runs DentalCAM and DentalCNC..
 - After the selected number of days, DentalCNC automatically deletes data of machined jobs from the CAM computer
 The computer that is connected to your machine and which runs DentalCAM and DentalCNC.. The corresponding jobs still display in the job archive, but you can no longer restore them.
By default, the vacuum sensor of machines which require an external air extraction system is calibrated when you open the working chamber door. If the suction unit is switched on during this calibration, the calibration will yield incorrect values. This will lead to incorrect vacuum monitoring.
Central extraction systems cannot be controlled by the machine or the user. If your machine is connected to such a system, you must deactivate vacuum sensor calibration.
- To deactivate vacuum sensor calibration, activate the Central suction available option.
- To calibrate the vacuum sensor:
- Disconnect the central extraction system from the machine.
- Deactivate the option.
- Open the working chamber door
By default, DentalCAM stores the calculated job data in the CNCTransfer folder. DentalCNC uses the data in this folder to machine the jobs. You can change the folder e.g., to store all calculated job data in a network folder.
In order to control your machine, DentalCNC needs to know the correct USB port number. If you use the CAM computer![]() The computer that is connected to your machine and which runs DentalCAM and DentalCNC. with only 1 machine, finding the port number is usually only required once upon installation of the machine and manufacturing software
The computer that is connected to your machine and which runs DentalCAM and DentalCNC. with only 1 machine, finding the port number is usually only required once upon installation of the machine and manufacturing software![]() Term for the software package consisting of DentalCAM and DentalCNC..
Term for the software package consisting of DentalCAM and DentalCNC..
If you want to control multiple machines with 1 CAM computer![]() The computer that is connected to your machine and which runs DentalCAM and DentalCNC., use our multi-machine control feature.
The computer that is connected to your machine and which runs DentalCAM and DentalCNC., use our multi-machine control feature.
In most cases, DentalCNC can automatically determine the port number without manual configuration.
If your machine has an Ethernet port, you need to enter the machine's Ethernet address (also called MAC address) into the Machine Ethernet address input field.
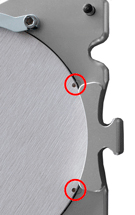
If you want to use a disc again to manufacture additional objects from it, it is important to mount the disc in the exact same position in the working chamber. To make this easier for you, the machine can mark the disc on the right-hand side with 2 small holes. When you re-mount the disc, make sure that the holes are in the same position as when you removed the disc.

A disc marked with holes which make re-mounting easier
- If you want the machine to mark discs, activate the Mark discs for safer remounting option.
Breathing difficulties caused by processing dust
Processing dust that gets into your lungs can cause breathing difficulties.
- Clean the machine only if the air extraction system is properly installed and activated.
- Wear a face mask of class FFP2 during the entire cleaning.
If your machine controls the suction unit, DentalCNC can automatically switch on the device when the working chamber door is open (recommended). The documentation for your machine contains information on if and how the machine can control the suction unit.
- If you want DentalCNC to switch on your suction unit when the working chamber door is open, activate the Activate the suction device when opening the working chamber door option.
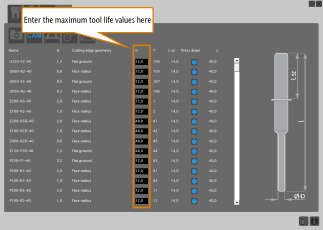
In the Tool list view you can enter the maximum tool life and configure the press down function for each tool type.
- Open the DentalCNC Application settings. For this, select the following icon in :

- Open the Tool list. For this, select the following icon in :

- The tool list displays. It contains a table with all tools for your machine and their corresponding data.
- Name
The tool match code.
- D
The cutting edge diameter in millimeters
- Tool geometry
The tool geometry
- h
The maximum tool life as a decimal value in hours
- T (CAM)
A unique identification number that is shared between DentalCAM and DentalCNC.
- L sz
The length of the tool shank from top to the ring in millimeters.
- Press down
- L
The length of the tool in millimeters
Keeping track of tool life values is one of the major functions of DentalCNC.
The formula is:
Maximum tool life — Operating time = Remaining tool life
You can manually enter the maximum tool life for each tool type in the Tool list in the DentalCNC settings.
In addition, DentalCNC can calculate the maximum tool life based on the maximum tool life values which have been achieved in the past.
The maximum values for tool service life that you can actually achieve with your tools depend on many factors, such as the quality of the tools, the quality of the blanks, machine maintenance and cleaning, etc.
You need you specify the maximum tool life as a decimal value using a decimal comma (not a decimal point).
- Enter the desired maximum tool life value into the h column of the tool table and press Enter.
When the machine unloads tools into the tool magazine, these may not be completely pushed into the inserts. As a result, the ring of the affected tools is extremely stressed when the machine loads them into the collet chuck again.
To prevent this from happening, the machine can press down tools before loading them into the collet chuck.
- To activate the press down function for specific tool types, activate the desired check boxes in the Press down column.
By default, the press down function is activated for all tool types. We recommend keeping it activated.
You may not always be present while your machine is operating, which may cause you to miss important events such as a job interruption or job completion. In the Email notifications view you can activate email notifications which DentalCNC will send out in case of specific events.
- Open the DentalCNC Application settings. For this, select the following icon in the main icon bar:

- Open the Email notifications view. For this, select the following icon in the lower icon bar:

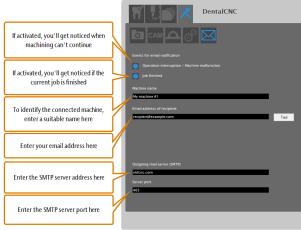
- The Email notifications view displays.
- In the Events for email notification section, activate the check boxes for the events that you want to receive an email notification for:
Operation interruption / Machine malfunction
Job finished
You will receive an email notification when manufacturing is interrupted or a machine malfunction has occurred.
You will receive an email notification when machining is complete.
- Enter a name for the machine into the Machine name input field that helps you distinguish the machine from other machines or equipment.
- Enter the email address that DentalCNC will send the emails to into the Email address of recipient input field.
- Enter the address of the SMTP server
 A server which receives emails using the SMTP protocol for relaying. which is used to send the emails into the Outgoing mail server (SMTP) input field.
 -
Enter the port which is used by the SMTP server
 A server which receives emails using the SMTP protocol for relaying. to receive the emails into the Server port input field.
DentalCNC Default value: 465
If you want to change the information required for the last 2 steps, you may need to contact your IT administrator.
- (Optional) Test the email notifications by clicking on the Test button.
- DentalCNC tries to send the test email. If the application informs you in a new window after several seconds that it cannot connect to the server, you cannot send emails under the current system and/or network configuration. You may also want to check the entered server address and port.
- (Optional) Retrieve the test mail from the address which you sent it to.
- If you have received the test email, email notifications are working. If not, the error is likely caused by your email provider.
Default value: vhfcnc.com
The Machine data view mainly contains information and settings for customer service. However, the following tasks might also be relevant for you:
- Retrieving the DentalCAM license key, machine serial number, number of control unit
- Unlocking extra equipment
 Physical component which must be obtained separately and which adds new functionality to your machine. for DentalCNC
 - Forcing the manual tool change for certain tool magazine positions
- Open the DentalCNC Application settings. For this, select the following icon in the main icon bar:

- Open the Machine data view. For this, select the following icon in the lower icon bar:

- The Machine data view displays.
In the Machine data view, the license key, machine serial number and number of control unit display (see figure above).
Serial numbers starting with TSN are incorrect. In this case, read the serial number on the identification plate of the machine.

Machine serial number

Number of control unit or product key
Either a product key or a serial number is stored on the control unit.
Product keys and serial numbers are not identical.
-
Serial numbers are stored on legacy control units.
-
Product keys are stored on current control units.
They are printed on a label on the control unit.

Example: Product key label
You can also check the license status which indicates whether the applications are properly licensed:

Checking the license status
The license status consists of the following entries:
- Upper entry DentalCNC license status
- Lower entryDentalCAM license status
There are 2 license statuses:
- OKThe program is properly licensed.
- NOKThe program is not licensed.
For more licensing information, see here.
For many machines, extra equipment![]() Physical component which must be obtained separately and which adds new functionality to your machine. is available which increases the range of blank types that you can process; e.g., a block holder for machines which are equipped with a disc holder at delivery. Often, this extra equipment
Physical component which must be obtained separately and which adds new functionality to your machine. is available which increases the range of blank types that you can process; e.g., a block holder for machines which are equipped with a disc holder at delivery. Often, this extra equipment![]() Physical component which must be obtained separately and which adds new functionality to your machine. needs to be unlocked before corresponding jobs can be manufactured with DentalCNC.
Physical component which must be obtained separately and which adds new functionality to your machine. needs to be unlocked before corresponding jobs can be manufactured with DentalCNC.
Beside the unlocking option in the Machine data view, DentalCNC asks for an unlock code as soon as you start machining a job which requires extra equipment![]() Physical component which must be obtained separately and which adds new functionality to your machine.. In these cases, all information given here apply as well.
Physical component which must be obtained separately and which adds new functionality to your machine.. In these cases, all information given here apply as well.
You can only unlock extra equipment![]() Physical component which must be obtained separately and which adds new functionality to your machine. for the machine you ordered it for.
Physical component which must be obtained separately and which adds new functionality to your machine. for the machine you ordered it for.
You unlock extra equipment![]() Physical component which must be obtained separately and which adds new functionality to your machine. as follows:
Physical component which must be obtained separately and which adds new functionality to your machine. as follows:
- Have the unlock code that you received with the extra equipment
 Physical component which must be obtained separately and which adds new functionality to your machine. readily available. If the unlock code is missing, contact customer service.
 - Make sure that DentalCNC has established a connection to the correct machine.
- If you want to unlock extra equipment
 Physical component which must be obtained separately and which adds new functionality to your machine. in the Machine data view, activate the check box for the corresponding extra equipment
 Physical component which must be obtained separately and which adds new functionality to your machine..
 - A window opens. DentalCNC prompts you to enter the unlock code.
- Enter the unlock code that you received with the extra equipment
 Physical component which must be obtained separately and which adds new functionality to your machine. and press Enter.
 - If the unlock code is valid, DentalCNC unlocks the extra equipment
 Physical component which must be obtained separately and which adds new functionality to your machine. for the connected machine.
 - If the unlock code is invalid, verify that you actually ordered the extra equipment
 Physical component which must be obtained separately and which adds new functionality to your machine. for the connected machine and that the unlock code you entered is correct. If the unlock code is still invalid, contact customer service.
The blank holder of K5 machines can be exchanged with the DirectDisc blank holder which is used in K5+ machines.
- After the exchange, activate the DirectDisc blank holder option.
If you do not activate this setting after the exchange, the risk of machine damage is significantly increased.
Tool change can take place automatically via the tool magazine or manually via the collet chuck. Since each tool position can be configured individually, automatic and manual changes are possible in parallel.
Automatic tool change properties
-
The machine automatically loads the necessary tools from the magazine during machining.
-
You must insert all required tools into the tool magazine before the job begins.
-
Default case for all tool positions where no manual change is configured in DentalCNC.
Automatic tool change is not possible in the following cases:
-
A tool position is worn out and can no longer hold any tools properly.
-
You use tools which do not fit into the tool magazine.
Manual tool change properties
-
During the application, you manually insert the tools into the spindle’s collet chuck at the request of DentalCNC.
-
You must configure this manual tool change for individual tool positions in DentalCNC.
-
In these cases, you can force a manual tool change for the affected tool positions in the Tool positions area of the Machine data view.
- Make sure that the correct tools are loaded into the corresponding virtual tool magazine positions.
- To enforce a manual tool change for a certain tool magazine position, select the following icon in the corresponding line:

- The icon turns blue. When a tool is required from the corresponding tool position, the spindle moves into the change position and DentalCNC prompts you to manually insert the tool into the collet chuck.


