Applies to: N4, N4+, Z4, S5, S1, S2, R5, K5
Installing and using the DESS Pre-milled abutment holder
The DESS Pre-milled abutment holder is available for the following machines:
- K5
- N4 / N4+
- R5
- S5
- Z4
Not every version of dentalcam & dentalcnc supports all abutment holders. Recommendation: Upgrade to the latest version for maximum compatibility.
With the DESS abutment holder, the machine can machine abutments with prefabricated connection geometries that fit into the holder ( Supported prefabricated abutment blanks in dentalcam 8).
You can mount blanks in the abutment holder before you install the holder into the machine or vice versa.
Item overview
You should have received the following items:
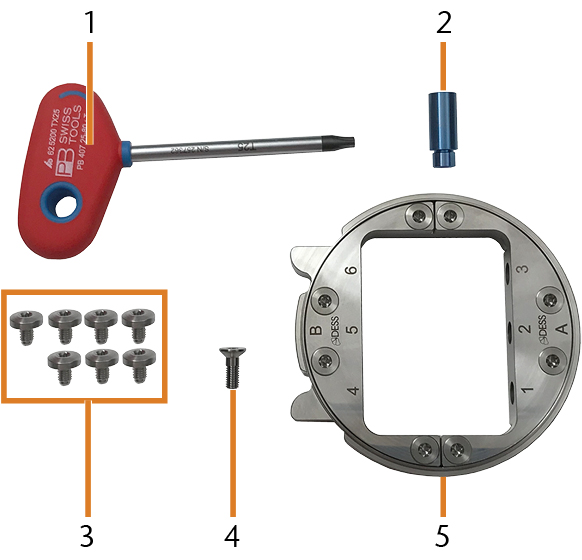
The components delivered with the abutment holder
- 1 x Torx screwdriver
- 1 x Abutment blank dummy (dummy not suitable for processing)
- 7 x Oval-head screw (M5 x 7.5)
- 1 x Countersunk screw (M5 x 14)
- 1 x DESS Pre-milled abutment holder
Preparing the installation
-
Have ready:
- Wet cloth
- Mild cleaning agent (optional)
-
Thoroughly clean the blank holder.
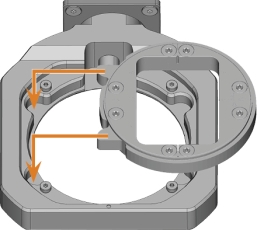
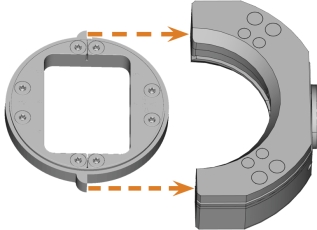
- Unscrew the 4 screws (marked orange) on top of the abutment holder and remove the abutment grip.

- The according abutment position is available.

-
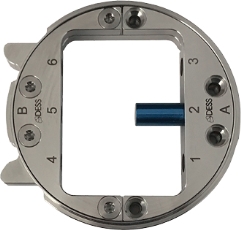
Push the Pre-milled abutment into the holder until it is properly seated. The base of the blank must point with its flat part (marked blue) towards the flat part of the abutment grip (marked orange).

- Secure the abutment with the oval-head screw.

- Insert the abutment grip into the abutment holder.
Inserting the abutment grip into the abutment holder (dummy not suitable for machining)
- Screw in the 4 screws (marked orange) on top of the abutment holder.

Screwing in the screws (dummy not suitable for processing)
- The Pre-milled abutment is mounted.


Installing the DESS Pre-milled abutment holder
- Insert the DESS Pre-milled abutment into the DESS Pre-milled abutment holder.
- Open the working chamber door.
- Loosen the 4 screws (marked orange in the figure) which attach the fixing ring to the blank holder.
- Remove the fixing ring by turning it clockwise and pulling it upwards.
- Remove the blank from the blank holder if present.
- Correctly orient the DESS Pre-milled abutment holder:
- The numbers labeling the abutment positions must face upwards.
- The positioning aids must be positioned on the left side.
- Insert the DESS Pre-milled abutment holder into the blank holder.
Insert the DESS Pre-milled abutment holder into the blank holder
- Screw down the fixing ring with the provided torque wrench.

Tighten the screws firmly. If the abutment holder moves or vibrates during processing, the result may become unusable.
You can equip the abutment holder with a maximum amount of 6 prefabricated abutments type DESS Pre-milled.
With the DESS abutment holder, the machine can machine abutments with prefabricated connection geometries that fit into the holder ( Supported prefabricated abutment blanks in dentalcam 8).
You can mount blanks in the abutment holder before you install the holder into the machine or vice versa.
Item overview
You should have received the following items:
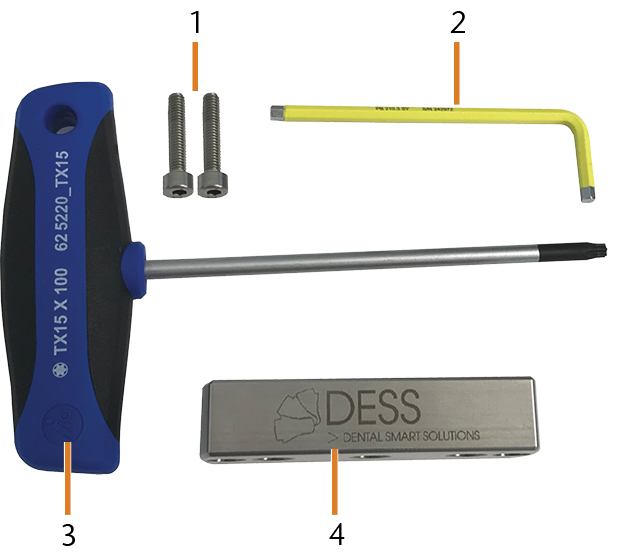
The components delivered with the abutment holder
- 2 x Cylinder screw (M4 x 20)
- 1 x Allen key
- 1 x Torx screwdriver
- 1 x DESS Pre-milled abutment holder
Preparing the installation
-
Have ready:
- Wet cloth
- Mild cleaning agent (optional)
-
Thoroughly clean the blank holder.
Installing the DESS Pre-milled abutment holder
- Open the working chamber door.
- Remove the blank from the blank holder if present.
- Correctly orient the DESS Pre-milled abutment holder:
- The 3 positioning pins must be inserted into the drill holes of the DESS Pre-milled abutment holder.
- Insert the DESS Pre-milled abutment holder into the blank holder.
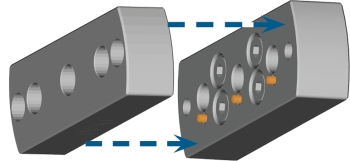
Insert the DESS Pre-milled abutment holder into the blank holder
- Push the DESS Pre-milled abutment holder into the blank holder as far as possible.
- To fixate the DESS Pre-milled abutment holder, screw the 2 cylinder screws into the blank holder with the provided allen key.

You can equip the abutment holder with a maximum amount of 3 prefabricated abutments type DESS Pre-milled.
- Loosen the screw of the desired abutment position. Do not remove the screw.
- The according abutment position is open.
-
Push the Pre-milled abutment into the holder until it is properly seated. The flattened part of the abutment base (marked blue) must point towards the screw of the abutment position (marked orange).
- Re-tighten the respective screw of the Pre-milled abutment holder.
- The Pre-milled abutment is mounted.

With the DESS abutment holder, the machine can machine abutments with prefabricated connection geometries that fit into the holder ( Supported prefabricated abutment blanks in dentalcam 8).
You can mount blanks in the abutment holder before you install the holder into the machine or vice versa.
Item overview
You should have received the following items:

The components delivered with the abutment holder
- 1 x Torx screwdriver
- 1 x Abutment blank dummy (dummy not suitable for processing)
- 7 x Oval-head screw (M5 x 7.5)
- 1 x Countersunk screw (M5 x 14)
- 1 x DESS Pre-milled abutment holder
- Unscrew the 4 screws (marked orange) on top of the abutment holder and remove the abutment grip.
- The according abutment position is available.

-
Push the Pre-milled abutment into the holder until it is properly seated. The base of the blank must point with its flat part (marked blue) towards the flat part of the abutment grip (marked orange).
- Secure the abutment with the oval-head screw.
- Insert the abutment grip into the abutment holder.
Inserting the abutment grip into the abutment holder (dummy not suitable for machining)
- Screw in the 4 screws (marked orange) on top of the abutment holder.

Screwing in the screws (dummy not suitable for processing)
- The Pre-milled abutment is mounted.


Installing the DESS Pre-milled abutment holder
- Insert the DESS Pre-milled abutment into the DESS Pre-milled abutment holder.
- Open the working chamber door.
- Remove the blank from the blank holder if present.
- Correctly orient the DESS Pre-milled abutment holder:
- Insert the DESS Pre-milled abutment holder into the blank holder.
Insert the DESS Pre-milled abutment holder into the blank holder

You can equip the abutment holder with a maximum amount of 6 prefabricated abutments type DESS Pre-milled.
With the DESS abutment holder, the machine can machine abutments with prefabricated connection geometries that fit into the holder ( Supported prefabricated abutment blanks in dentalcam 8).
You can mount blanks in the abutment holder before you install the holder into the machine or vice versa.
Item overview
You should have received the following items:
The components delivered with the abutment holder
- 1 x Torx screwdriver
- 1 x Abutment blank dummy (dummy not suitable for processing)
- 7 x Oval-head screw (M5 x 7.5)
- 1 x Countersunk screw (M5 x 14)
- 1 x DESS Pre-milled abutment holder
Preparing the installation
-
Have ready:
- Wet cloth
- Mild cleaning agent (optional)
-
Thoroughly clean the blank holder.
- Unscrew the 4 screws (marked orange) on top of the abutment holder and remove the abutment grip.
- The according abutment position is available.
-
Push the Pre-milled abutment into the holder until it is properly seated. The base of the blank must point with its flat part (marked blue) towards the flat part of the abutment grip (marked orange).
- Secure the abutment with the oval-head screw.
- Insert the abutment grip into the abutment holder.
Inserting the abutment grip into the abutment holder (dummy not suitable for machining)
- Screw in the 4 screws (marked orange) on top of the abutment holder.
Screwing in the screws (dummy not suitable for processing)
- The Pre-milled abutment is mounted.
Installing the DESS Pre-milled abutment holder
- Insert the DESS Pre-milled abutment into the DESS Pre-milled abutment holder.
- Open the working chamber door.
- Loosen the 4 screws (marked orange in the figure) which attach the fixing ring to the blank holder.
- Remove the fixing ring by turning it clockwise and pulling it upwards.
- Remove the blank from the blank holder if present.
- Correctly orient the DESS Pre-milled abutment holder:
- The numbers labeling the abutment positions must face upwards.
- The positioning aids must be positioned on the left side.
- Insert the DESS Pre-milled abutment holder into the blank holder.
Insert the DESS Pre-milled abutment holder into the blank holder
- Screw down the fixing ring with the provided torque wrench.
Tighten the screws firmly. If the abutment holder moves or vibrates during processing, the result may become unusable.
You can equip the abutment holder with a maximum amount of 6 prefabricated abutments type DESS Pre-milled.
With the DESS abutment holder, the machine can machine abutments with prefabricated connection geometries that fit into the holder ( Supported prefabricated abutment blanks in dentalcam 8).
You can mount blanks in the abutment holder before you install the holder into the machine or vice versa.
Item overview
You should have received the following items:
The components delivered with the abutment holder
- 1 x Torx screwdriver
- 1 x Abutment blank dummy (dummy not suitable for processing)
- 7 x Oval-head screw (M5 x 7.5)
- 1 x Countersunk screw (M5 x 14)
- 1 x DESS Pre-milled abutment holder
Preparing the installation
-
Have ready:
- Wet cloth
- Mild cleaning agent (optional)
-
Thoroughly clean the blank holder.
- Unscrew the 4 screws (marked orange) on top of the abutment holder and remove the abutment grip.
- The according abutment position is available.
-
Push the Pre-milled abutment into the holder until it is properly seated. The base of the blank must point with its flat part (marked blue) towards the flat part of the abutment grip (marked orange).
- Secure the abutment with the oval-head screw.
- Insert the abutment grip into the abutment holder.
Inserting the abutment grip into the abutment holder (dummy not suitable for machining)
- Screw in the 4 screws (marked orange) on top of the abutment holder.
Screwing in the screws (dummy not suitable for processing)
- The Pre-milled abutment is mounted.
Installing the DESS Pre-milled abutment holder
- Insert the DESS Pre-milled abutment into the DESS Pre-milled abutment holder.
- Select an empty blank magazine
 Part of the blank changer in which you store the blanks for automatic loading. slot and move it to the change position. Make sure the blank magazine Part of the blank changer in which you store the blanks for automatic loading. slot is available in dentalcnc.
 - Remove the blank frame from the blank magazine Part of the blank changer in which you store the blanks for automatic loading..
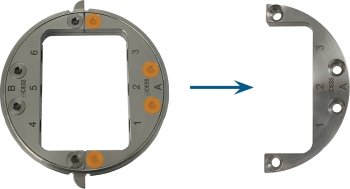
- Correctly orient the DESS Pre-milled abutment holder:
- The numbers labeling the abutment positions must face the same direction as the fixing brackets of the blank frame.
- Insert the DESS Pre-milled abutment holder into the blank frame.
- Remount the fixing brackets.
- Insert the disc or block holder into the change position of the tool magazine. Make sure the blank magazine Part of the blank changer in which you store the blanks for automatic loading. slot is available in dentalcnc.
Tighten the screws firmly. If the abutment holder moves or vibrates during processing, the result may become unusable.

Inserting the DESS Pre-milled abutment holder into the blank frame
You can equip the abutment holder with a maximum amount of 6 prefabricated abutments type DESS Pre-milled.
With the DESS abutment holder, the machine can machine abutments with prefabricated connection geometries that fit into the holder ( Supported prefabricated abutment blanks in dentalcam 8).
There are 2 versions of the DESS abutment holder for the Z4. They only differ in terms of handling. You can use dentalcam and all compatible abutments with both variants.
Item overview
You should have received the following items:
Variant A

The components delivered with the abutment holder
- 2 x Threaded bolt (M5 x 7.5)
- 1 x Torx screwdriver
- 1 x DESS Pre-milled abutment holder
Variant B

The components delivered with the abutment holder
- 1 x Torx screwdriver
- 1 x DESS Pre-milled abutment holder
Preparing the installation
-
Have ready:
- Wet cloth
- Mild cleaning agent (optional)
-
Thoroughly clean the blank holder.
Mounting DESS Pre-milled abutments
Bad machining results caused by incorrect scanning of prefabricated abutments
If there is moisture or dirt on the prefabricated abutments, the machine will scan them incorrectly. The machining result will become unusable as a result.
- Wipe over the bellow before you insert prefabricated abutments so that no cooling liquid drips onto them.
- Clean the prefabricated abutments with a dry, lint-free cloth before processing.
You always clamp abutments in the abutment holder outside the machine.
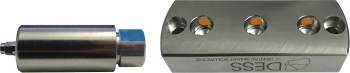
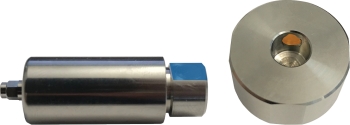
With variant B, you clamp abutments with a fixing screw in the abutment mount of the holder.

-
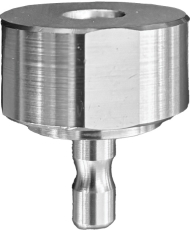
Main body
-
Shaft for the blank holder
-
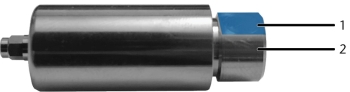
Abutment mount
-
Fixing screw
-
Torsion protection due to flattened part
-
Hold the abutment holder on the main body with 2 fingers. The abutment holder points upwards.
-
Insert the abutment base into the mount.
-
Torsion protection due to flattened part
-
Abutment base
-
Pay attention to the torsion protection when inserting the abutment: both the abutment mount and the abutment base have a flattened part.
-
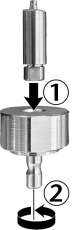
Press the abutment lightly into the abutment mount.
-
-
Screw in the abutment. Turn the shaft with the other hand as shown:
-
Screw down the abutment with the provided screwdriver.


- Loosen the screw of the abutment position. Do not remove the screw.
- The according abutment position is open.
-
Push the Pre-milled abutment into the holder until it is properly seated. The flattened part of the abutment base (marked blue) must point towards the screw of the abutment position (marked orange).
- Re-tighten the respective screw of the Pre-milled abutment holder.
- The Pre-milled abutment is mounted.

Installing the DESS Pre-milled abutment holder
- Insert the DESS Pre-milled abutment into the DESS Pre-milled abutment holder.
- Open the working chamber door.
- Open the collet chuck of the blank holder.
- Remove the blank from the blank holder if present.
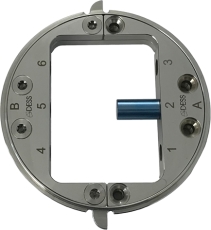
- Correctly orient the DESS Pre-milled abutment holder:
- The pin on the blank holder must be inserted into the drill hole the DESS Pre-milled abutment holder.
- Insert the DESS Pre-milled abutment holder into the blank holder.

Insert the DESS Pre-milled abutment holder into the blank holder
- Push the DESS Pre-milled abutment holder into the blank holder as far as possible.
- Close the blank holder.

You can equip the abutment holder with a maximum amount of 1 prefabricated abutments type DESS Pre-milled.